How to Unclog a Drain: Simple Methods to Try Before Calling a Plumber
A slow or completely clogged drain is one of those household problems that can go from mildly annoying to unusable surprisingly quickly.
The good news is that many single-fixture clogs can be cleared without calling a plumber.
Hair, soap residue, food debris, grease and buildup inside the trap are common causes, and the best solution is often physically removing the material causing the blockage rather than pouring something down the drain and hoping it disappears.
The key is knowing what to try first and when to stop.
If several drains are backing up at the same time, sewage is coming up through another fixture, or the clog repeatedly returns, the problem may be farther down the plumbing system and beyond a simple DIY repair.
First, Figure Out What Kind of Clog You Have
Before grabbing a tool, look at what the drain is doing.
The drain is just slow
A slow drain usually means water can still get past the blockage.
Hair around a bathroom stopper, soap buildup, grease or debris inside the P-trap are common possibilities.
This is usually the best situation for a DIY repair.
The drain is completely blocked
If water doesn’t move at all, the obstruction may be larger or more compacted.
You may need a plunger, drain tool, P-trap cleaning or small drain auger rather than simply flushing the pipe.
More than one drain is backing up
This is different.
If a toilet, shower and sink begin backing up around the same time, or using one fixture causes water to appear in another, the blockage may be in a branch line or main drain.
That is usually the point where calling a plumber makes more sense than repeatedly working on one fixture. Home Depot similarly notes that a blockage affecting only one drain is generally located between that fixture and the main line. The Home Depot
Step 1: Remove Anything You Can Reach
Start with the easiest possibility.
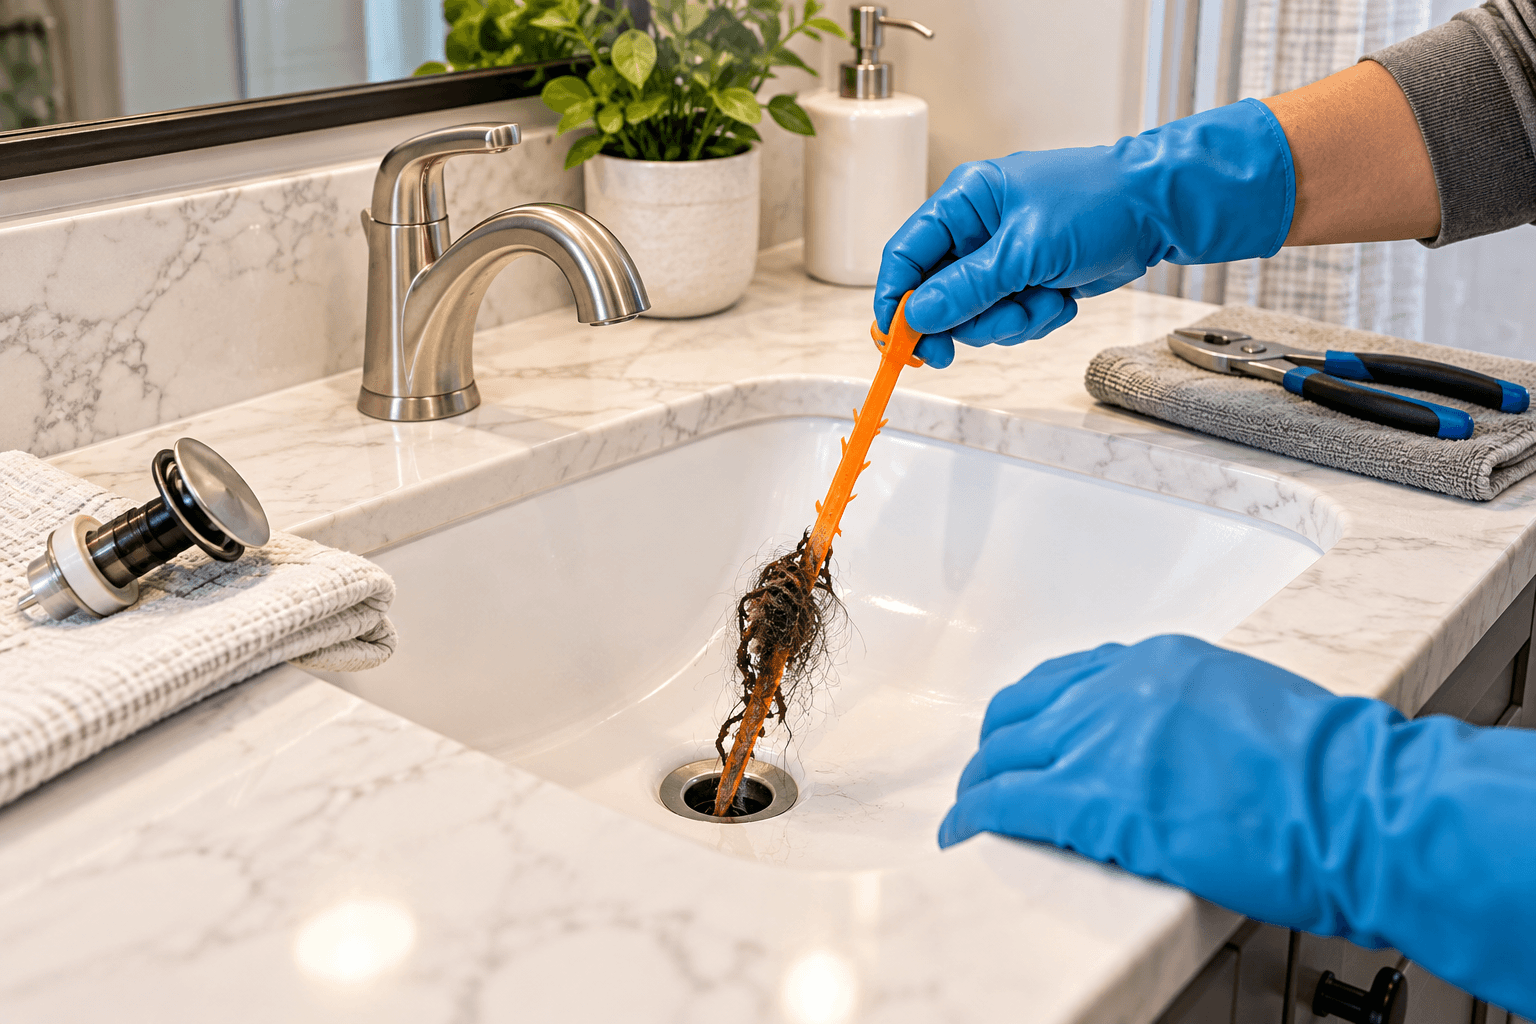
Bathroom sinks, tubs and showers frequently collect hair and soap residue immediately below the drain opening.
Remove the stopper or drain cover if it can be easily accessed and look inside.
You may find a surprising amount of:
- Hair
- Soap residue
- Toothpaste buildup
- Small debris
- Sludge around the stopper mechanism
A plastic barbed drain tool can be useful for pulling hair from just below the opening.
Wear gloves and have paper towels or a small trash bag nearby. It isn’t glamorous, but physically removing the clog is often much more effective than trying to dissolve it.
Home Depot notes that bathroom sink and shower clogs are frequently located just below the opening or around the stopper and can often be pulled out with a simple hair-removal tool. The Home Depot
Step 2: Try Hot Water for Light Kitchen Buildup
If a kitchen sink is draining slowly rather than completely blocked, hot water may help loosen light grease and residue.
Run the hottest water your faucet provides for several minutes and see whether the flow improves.
Avoid assuming that boiling water is appropriate for every plumbing system. Very hot water can be harder on some plastic piping and connections, particularly older installations.
Hot tap water is a more conservative first step.
And remember that water can’t dissolve a physical obstruction such as a wad of hair, a piece of food or an object caught inside the pipe.
If the drain remains slow, move on.
What About Baking Soda and Vinegar?
You’ve probably seen the classic advice:
Pour baking soda into the drain, add vinegar and watch it fizz.
The reaction looks impressive, but it is not a reliable way to remove a substantial clog.
Baking soda and vinegar may help loosen light residue or freshen a drain, but the acid and base largely neutralize one another. It won’t magically dissolve a compacted hair clog or pull an object out of a trap. Advice from plumbing and cleaning sources varies on exactly how useful the mixture is, but even sources that recommend it generally position it for minor buildup rather than serious blockages. The Spruce
For a real clog, move to a method that physically moves or removes the blockage.
Step 3: Use a Plunger
A plunger isn’t just for toilets.
For a sink, tub or shower, a small cup-style plunger can create pressure and suction that helps dislodge a blockage farther down the line.
Add enough water to cover the bottom edge of the plunger.
Place it firmly over the drain and create a good seal.
Then plunge several times using controlled up-and-down movements.
The goal isn’t to hit the drain as hard as possible. You’re creating alternating pressure inside the pipe.
Bathroom sinks have one extra step
Many bathroom sinks have an overflow opening near the top of the basin.
Cover the overflow with a wet cloth while plunging.
Otherwise, much of the pressure you’re trying to create can escape through that opening.
If the water suddenly begins flowing, run water afterward and make sure the drain continues to clear normally.
Important: Don’t Plunge After Using Chemical Drain Cleaner
If you’ve already poured chemical drain cleaner into standing water, don’t start plunging, removing the P-trap or inserting tools into the drain.
The chemical may still be sitting inside the pipe.
A plunger can splash it back onto your skin or eyes, and opening the plumbing beneath the sink could expose you directly to the product.
Lowe’s specifically advises against using plungers or opening the P-trap after applying chemical drain cleaner because chemicals may remain in the standing water. Lowe’s
Follow the drain-cleaner manufacturer’s instructions instead.
And never mix two different drain cleaners or combine drain cleaner with bleach or other household chemicals. Mixing products can create dangerous fumes or reactions. Consumer Reports
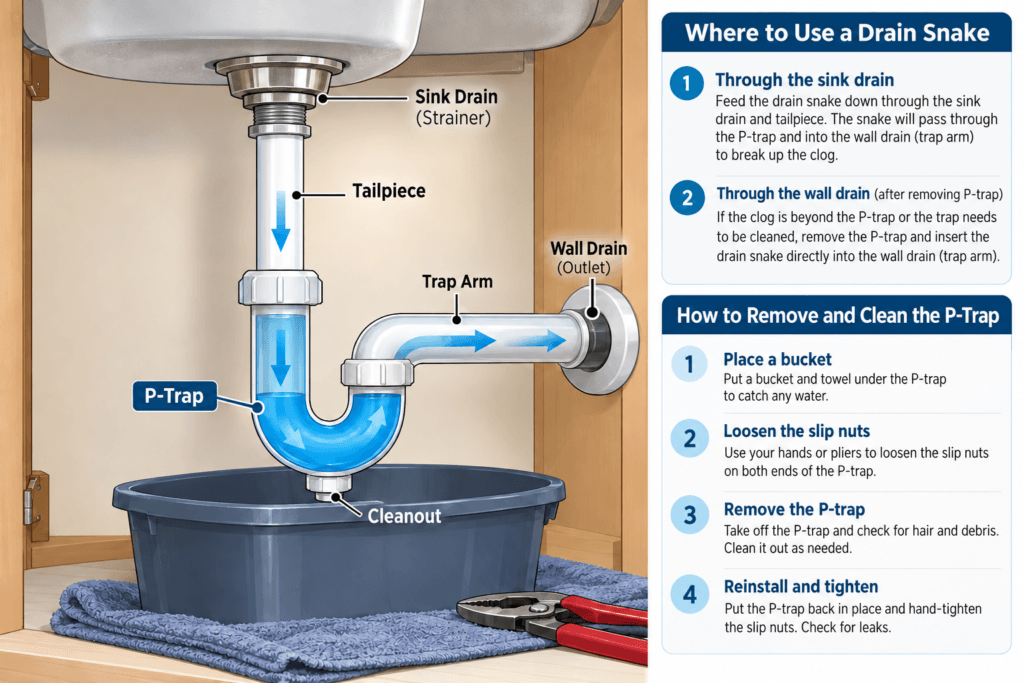
Step 4: Clean the P-Trap
If a sink still doesn’t drain, the clog may be sitting exactly where you’d expect debris to accumulate: inside the curved pipe beneath the sink.
That curved section is called the P-trap.
Its job isn’t just plumbing convenience. The trap intentionally holds a small amount of water that prevents sewer gases from entering the house. The Home Depot
Fortunately, many sink P-traps are fairly easy to access.
Before removing it
You’ll need:
- Bucket
- Gloves
- Old towels
- Pliers or adjustable wrench if needed
Place the bucket directly beneath the trap.
There will be water inside it even if the sink above appears empty.
Loosen the slip nuts at both sides of the trap and carefully lower it into the bucket.
Check inside for accumulated hair, food, grease or other debris.
Clean the trap thoroughly and inspect the washers and connections before reinstalling it.
Hand-tighten the fittings first and then test the drain while watching carefully for leaks.
If you’re uncomfortable disassembling the plumbing or the piping looks old, corroded or fragile, stop and call a plumber rather than forcing the fittings.
Don’t leave the drain pipe open
If the trap will remain removed for more than a few minutes, loosely plug the open waste pipe with a rag to limit sewer gas entering the room. Keep part of the rag outside the pipe so it cannot fall farther into the drain. Lowe’s
Step 5: Use a Drain Snake or Hand Auger
If the trap is clear but the sink is still blocked, the clog may be farther down the drain line.
That’s when a small hand auger or drain snake becomes useful.
The tool uses a long flexible cable that feeds into the pipe.
Rather than trying to force the cable straight through the obstruction, slowly rotate and advance it.
You may:
- Break through soft buildup
- Hook hair and pull it back
- Loosen debris enough for water to carry it away
Once you’ve worked through the blockage, slowly retrieve the cable and clean it as it comes out.
Then run water and confirm that the drain flows freely.
A small auger is one of the standard tools recommended when a clog lies beyond the P-trap. The Home Depot
Kitchen Sink With a Garbage Disposal? Be More Careful
A kitchen drain connected to a garbage disposal needs a slightly different approach.
If the disposal is jammed or clogged, turn off power to the disposal at the circuit breaker before attempting to clear it.
Do not rely only on the wall switch.
And never put your hand into the disposal opening.
A garbage disposal may have a manual turning point underneath the unit or a reset button, depending on the model.
If you’re unsure whether the problem is the disposal itself or the drain beyond it, don’t start taking the unit apart.
This is one of those cases where a service call can be cheaper than damaging the disposal or getting injured. Guidance for clearing garbage disposals also recommends disconnecting power at the breaker before working on them. Bob Vila
Should You Use Chemical Drain Cleaner?
Chemical drain cleaner can sometimes work, but I wouldn’t make it the first step for a normal household clog.
Mechanical methods have a major advantage:
They remove or move the actual obstruction.
Chemical cleaners also introduce another complication. Once you’ve poured one into the plumbing, safely disassembling the trap or using certain tools becomes more difficult because you may encounter corrosive liquid.
If you do use one:
- Confirm that it is intended for your pipe material
- Confirm that it is appropriate for the fixture
- Check compatibility with septic systems if applicable
- Wear the recommended eye and skin protection
- Ventilate the room
- Follow the exact product instructions
- Never mix products
Consumer Reports and Lowe’s both emphasize protective equipment, ventilation and never mixing drain-cleaning chemicals. Lowe’s
If one chemical product doesn’t work, don’t keep adding different chemicals.
Call a plumber and tell them what has already been placed in the drain.
Why Does the Drain Keep Clogging?
Clearing a drain once is one thing.
Clearing the same drain every few weeks means something else is going on.
Bathroom sinks, tubs and showers
The most common problem is often hair combined with soap and personal-care products.
A simple drain screen can dramatically reduce what enters the pipe.
Periodically remove hair from the stopper rather than waiting until the drain slows.
If you’re already doing bathroom maintenance, our How to Remove Hard Water Stains From Glass Shower Doors guide covers another common buildup problem around showers.
Kitchen sinks
Grease is a major problem.
Liquid cooking grease may appear harmless while hot, but it can cool and coat the inside of the drain piping.
Avoid sending these down the sink:
- Cooking grease
- Fats and oils
- Coffee grounds
- Large food scraps
- Fibrous food waste
Scrape dishes and cookware into the trash before washing whenever possible.
Running additional water doesn’t necessarily make inappropriate material safe to put down the drain.
When Should You Call a Plumber?
DIY methods make sense when the problem appears limited to one accessible fixture.
They make less sense when the symptoms suggest a larger drainage problem.
Call a plumber if:
- Several drains are backing up at once
- Water comes up through another fixture
- The clog returns repeatedly
- You hear significant gurgling from multiple drains
- Sewage or strong sewer odors are present
- An auger doesn’t clear the obstruction
- Older plumbing looks damaged or corroded
- You suspect roots or a damaged underground line
- You’ve used chemical drain cleaner and still cannot clear the blockage
Repeatedly forcing a snake farther into a system you don’t understand isn’t necessarily saving money.
Sometimes identifying that the problem is not a simple fixture clog is the most useful DIY diagnosis you can make.
Preventing the Next Clog Is Easier Than Clearing It
Once the drain is working again, a few simple habits can reduce the chances of doing this twice.
Use hair screens in showers and tubs.
Clean sink stoppers periodically.
Keep grease and food waste out of kitchen drains.
Pay attention when a drain starts slowing rather than waiting for it to stop completely.
And don’t treat the drain as a convenient disposal system.
Most household clogs don’t happen instantly. They build gradually until the remaining opening becomes too small for water to pass freely.
Catching that slowdown early makes the fix much easier.
Final Takeaway
If one sink, tub or shower is clogged, start simple.
Remove visible debris first.
Then try a plunger.
If that doesn’t work, inspect the P-trap or use a small drain snake.
Those methods address the physical material that causes many household clogs without immediately reaching for strong chemicals.
The important part is also knowing when the problem has moved beyond a basic DIY repair.
If several fixtures are affected, the clog repeatedly returns or you can’t reach the obstruction with normal household tools, stop before turning a small plumbing problem into a larger one.
Sometimes calling a plumber isn’t giving up on the DIY repair.
It’s recognizing that you’ve already ruled out the easy fixes.
Tackling a DIY Home Repair?
Explore Builzee’s DIY guides for practical help with repairs, painting, maintenance and home improvement projects you can handle yourself.