How to Patch a Hole in Drywall: Small Holes to Large Repairs
Drywall is easy to damage, but most holes are also fairly easy to repair if you use the right method for the size of the opening.
A nail hole left behind by a picture frame may need little more than a dab of spackle. A hole from a door handle or wall anchor may need reinforcement. Once the damage becomes several inches wide, the repair starts to involve actual pieces of drywall, backing, tape, and joint compound.
If you’re trying to figure out how to patch a hole in drywall, start by looking at the size of the damaged area and whether the drywall around it is still solid. The larger the opening, the more important support becomes.
Drywall Repair by Hole Size
| Hole size | Typical repair | Difficulty | Approximate time |
|---|---|---|---|
| Nail holes, screw holes and small dents | Spackle or joint compound | Easy | 10 to 30 minutes plus drying |
| Up to about 1 inch | Patch compound or small reinforced patch | Easy | A few hours |
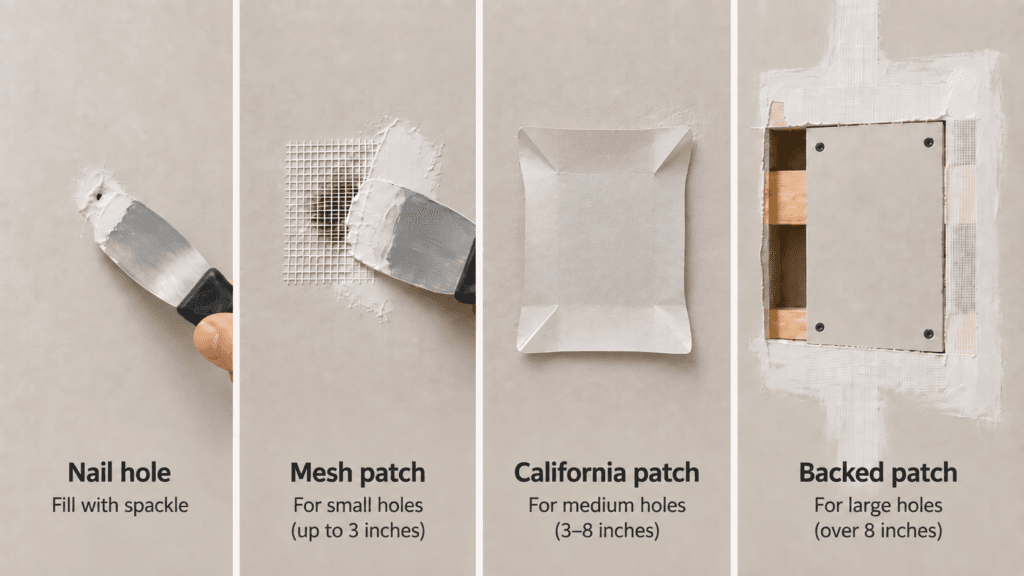
| About 1 to 4 inches | Mesh patch or California patch | Easy to moderate | Several hours to 1 day |
| About 4 to 8 inches | California patch or drywall piece with backing | Moderate | 1 to 2 days |
| Larger than about 8 inches | New drywall secured to backing or framing | Moderate | 1 to 2 days |
| Large or irregular damaged area | Cut back to sound drywall and replace the section | Moderate to difficult | 1 to 3 days |
Most of that time is waiting for compound, texture, primer, and paint to dry. The actual hands-on work is usually much shorter.
These sizes are only a guide. A clean 5-inch opening surrounded by solid drywall can be easier to repair than a smaller hole where the gypsum has crumbled or the face paper is torn several inches beyond the opening.
Start With Solid Drywall
Before patching anything, remove loose paper, broken gypsum, and material that no longer feels solid.
A drywall patch depends on the surrounding wall for support. If you apply compound over crushed drywall or loose face paper, the repair may look fine initially but can crack or separate later.
You should also understand why the damage occurred before closing the wall.
A hole from furniture, a doorknob, a removed wall anchor, or previous electrical work is usually straightforward. Soft drywall, brown staining, bubbling paint, mold, or an area that continues to become damaged is different. Those conditions can point to a plumbing leak, roof leak, window leak, HVAC condensation, or another moisture problem.
Fix the source of the moisture before repairing the drywall. Closing an active leak inside the wall only hides the problem.
Take extra care before cutting into a wall. Electrical wiring, plumbing lines, blocking, ductwork, and other components may be directly behind the drywall.
Spackle and Joint Compound Are Not the Same Thing
For tiny holes and shallow dents, spackle is usually the easiest material to work with. It comes ready to use, dries relatively quickly, and sands easily. Nail holes, small screw holes, and minor surface damage are exactly what it is made for.
Joint compound, often called drywall mud, is better once the repair gets larger. It is designed to work with drywall tape, mesh, seams, and wider feathered areas.
For a few picture holes, spackle is simpler. For a patch that needs reinforcement or multiple finishing coats, joint compound is generally the better choice.
Premixed all-purpose compound works well for most homeowner repairs. Setting-type compounds are also available and harden through a chemical reaction rather than relying only on air drying. They can speed up repairs, but they also give you a limited working time, which makes them less forgiving for beginners.
Repairing Nail Holes, Screw Holes and Small Dents
Small holes do not need reinforcement as long as the surrounding drywall is sound.
Scrape away any loose material and press down any raised paper around the hole. The repair should start slightly below or level with the surrounding wall rather than sitting on top of it.
Use a small putty knife to press spackle or joint compound into the opening. Scrape away the excess so the surface is nearly flush.
Once it dries, inspect the repair. Filler can shrink slightly, especially in deeper holes, so a second thin application may be needed.
Sand lightly when everything is dry. The goal is to smooth the filler into the surrounding paint surface, not remove drywall paper around it.
This same method works well for shallow dents where the drywall face is still intact.
Small Holes That Need Reinforcement
Once an opening becomes too large for filler to support itself, it needs something bridging the hole.
For openings around an inch or a few inches across, a self-adhesive fiberglass mesh patch is one of the simplest homeowner options.
Trim the damaged area until the drywall around it is firm. Center the mesh over the opening so it overlaps solid drywall on all sides.
Apply a thin coat of joint compound over the mesh. You need enough compound to fill the mesh and cover it, but avoid building a thick mound directly over the patch.
After the first coat dries, apply a second coat over a wider area. A third thin coat may be necessary to completely hide the patch.
This wider application is what makes the repair disappear.
The mesh patch sits slightly above the original wall surface, so you are not trying to make the patch itself perfectly flat. Instead, you gradually spread the compound farther away from it until the transition is too shallow to notice.
That process is called feathering.
A common mistake is keeping the compound too close to the hole. A 3-inch repair may ultimately need compound extending 8 inches or more around it. A wide, shallow repair is much harder to see than a narrow bump.
Medium Holes: California Patch or Backed Drywall Patch
Once a hole becomes several inches wide, you have two good repair options.
A California patch, sometimes called a butterfly patch, works particularly well when the surrounding drywall is solid and the opening is still relatively small.
For a larger or more heavily damaged area, installing a new piece of drywall over backing is usually stronger and more forgiving.
California Patch
A California patch uses a piece of drywall with a border of its face paper left around the outside. That paper flange overlaps the existing wall and acts like built-in drywall tape.
Cut a square or rectangular piece of drywall slightly larger than the damaged opening. Hold it against the wall and trace the solid center portion.
Cut the damaged drywall to match.
On the back side of your replacement piece, score the gypsum around the edges so you can remove it while leaving the front paper attached. You should end up with a drywall plug in the middle and a paper flange extending beyond it.
Spread a thin layer of joint compound around the opening, insert the patch, then press the paper flange into the wet compound with a drywall knife.
Remove excess compound from underneath the paper and let the first coat dry.
Additional coats should extend progressively farther onto the existing wall until the edges disappear.
The advantage of this method is that there is no thick mesh layer sitting over the drywall. The paper flange remains relatively thin, which makes it easier to create a flat-looking repair.
It works best on small to medium openings. Once the replacement piece becomes large enough to flex, adding actual backing behind the wall is a better approach.
Using Backing for a Stronger Drywall Repair
Backing gives a replacement drywall piece something solid to screw into.
This method is useful for medium repairs and becomes increasingly important as the opening gets larger.
Square up the damaged area first so you have straight, solid edges. Cut one or two strips of wood or plywood several inches longer than the opening.
Slide the backing through the hole and hold it against the backside of the existing drywall. Drive drywall screws through the wall and into the backing so it cannot move.
Cut a new piece of drywall to fit the opening and screw it to the backing.
The face of the new drywall should sit approximately flush with the existing wall. Use drywall of the same thickness whenever possible.
Backing matters because drywall is not especially strong by itself. An unsupported patch can flex when someone presses against the wall. That movement can eventually crack the compound around the repair.
A properly backed patch becomes part of the wall instead of simply covering the opening.
Repairing Large Drywall Holes
Large holes should be treated more like drywall installation than surface patching.
Trying to stretch mesh or compound across a large damaged area usually creates more work and a weaker finished repair.
Cut away the damaged drywall until you reach solid material. Whenever practical, make the opening square or rectangular. Straight cuts make the replacement piece easier to measure and fit.
If the opening reaches wall studs, the new drywall may be fastened directly to them. Where an edge does not land on framing, add backing so the replacement piece is supported.
Make sure all unsupported edges have something solid behind them.
Cut a replacement piece from drywall that matches the thickness of the existing wall. Half-inch drywall is common on residential walls, but it is not universal, so check before buying material.
Fit the new piece into the opening and secure it with drywall screws.
The screw heads should sit just below the surface without tearing through the face paper. If a screw breaks through the paper, its holding strength is reduced. Install another screw nearby rather than relying on the damaged location.
Once the patch is secure, the seams need to be reinforced before finishing.
Paper Tape and Mesh Tape
Paper drywall tape and fiberglass mesh tape can both be used during repairs, but they behave differently.
Paper tape is thin and creates a relatively low-profile joint. It is embedded into wet joint compound and is commonly used for standard drywall finishing.
The key is getting enough compound underneath the tape. If part of the paper is dry or trapped over an air pocket, it can bubble later.
Fiberglass mesh tape is easier to position because it is self-adhesive. It works well for many repair situations, particularly for homeowners who do not have much experience embedding paper tape.
Mesh is slightly thicker, though, so the finished compound usually needs to spread over a wider area to hide it.
Some mesh tape manufacturers recommend using setting-type joint compound for better crack resistance. Follow the recommendations for the specific tape you purchase.
Whichever system you use, the tape should reinforce the seam rather than create a thick ridge on top of it.
Build the Repair With Thin Coats
Good drywall finishing usually comes from several thin coats rather than one heavy application.
The first coat embeds the tape and fills the joint.
After it dries, scrape away obvious ridges and apply a second coat over a wider area.
The final coat should be thin and extend farther still, gradually blending the repair into the existing wall.
Trying to complete the repair in one thick application creates several problems. Thick compound dries slowly, shrinks more, cracks more easily, and requires much more sanding.
It is usually faster to apply another thin coat than to spend twenty minutes trying to sand down a large hump.
As you work outward from the patch, apply less pressure to the drywall knife toward the center and slightly more pressure at the outside edge. This helps taper the compound instead of leaving a hard ridge.
Let the Compound Dry Before Sanding
Drywall compound can look dry on the surface while still holding moisture underneath.
Humidity, temperature, compound type, coat thickness, and air movement all affect drying time.
Do not rush into sanding simply because the surface has changed color.
Compound that is still damp underneath can tear or gouge when sanded.
Once dry, use fine drywall sandpaper or a sanding sponge and work lightly. Sand just enough to remove ridges and blend the edges.
Run your hand across the wall afterward. Your fingers will often detect high spots and edges that are difficult to see.
Another useful trick is to hold a work light close to the wall and shine it across the repair from the side. The low-angle light makes shallow ridges and depressions much easier to spot.
If you uncover the drywall tape while sanding, stop. Do not keep grinding the area down. Apply another thin skim coat instead.
Matching the Existing Wall Texture
A drywall repair can be perfectly smooth and still stand out if the rest of the wall has texture.
Orange peel is common in many homes and can usually be duplicated on smaller repairs with an aerosol texture product. Practice on scrap cardboard first. The distance from the wall, spray setting, and amount of material all change the pattern.
Knockdown, skip trowel, and hand-applied textures require more technique. On highly visible walls, matching the existing texture is often the hardest part of the entire drywall repair.
The goal is not to duplicate every individual bump. What matters most is matching the overall density, size, and character of the surrounding finish.
Allow the texture to dry fully before priming.
Prime the Repair Before Painting
Do not skip primer just because the patch looks smooth.
Joint compound and new drywall are much more porous than an already painted wall. If you apply finish paint directly over them, the repaired area can absorb the paint differently.
The color may technically match, but the patch can still appear duller, shinier, or slightly different when light hits the wall.
This effect is often called flashing.
Primer seals the joint compound and gives the finish coat a more uniform surface.
Prime the entire repaired area, including the feathered compound around the patch.
Primer can also reveal imperfections you did not notice before. If you can still see a ridge, depression, or edge after priming, correct it before applying the finish paint.
Once the drywall repair is complete, Builzee’s How to Paint a Room: A Step-by-Step Guide for Beginners covers wall preparation, cutting in, rolling, and getting an even painted finish.
That keeps the drywall repair focused on patching and finishing rather than repeating the full painting process.
When Drywall Damage Points to a Bigger Problem
Most isolated holes are reasonable DIY projects. The situation changes when the drywall itself is telling you something is wrong.
Water damage should be investigated before the wall is closed. Repeated cracks can sometimes indicate movement rather than a simple finishing failure. Damage around windows, exterior doors, bathrooms, or ceilings may also be connected to moisture entering somewhere else in the building.
If the drywall problem is part of a larger list of work around the house, Builzee’s What Home Improvements Should You Do First? A Priority Guide for Homeowners can help you separate repairs that protect the home from improvements that are mainly cosmetic.
Large ceiling repairs, extensive water damage, complicated textures, and openings involving electrical or plumbing work may be better handled by a professional. If you are unsure where to draw the line, Builzee’s DIY vs. Hiring a Contractor: Which Home Projects Should You Do Yourself? explains which types of home projects are generally reasonable to tackle yourself and when hiring a contractor makes more sense.
A small wall patch is a good beginner project. Replacing a large ceiling section fifteen feet above the floor is a very different job.
Bottom Line
The right way to patch drywall depends mostly on the size of the damaged area and whether the surrounding material is still sound.
Tiny nail and screw holes usually need only filler. Small openings may need mesh reinforcement. Medium holes can be repaired with a California patch or a new piece of drywall secured to backing. Larger damaged areas should be cut back to solid material and repaired with properly supported drywall.
The part that separates an obvious patch from a good one is usually the finishing work. Apply several thin coats instead of one thick coat, feather the compound well beyond the opening, let each coat dry, sand lightly, match the existing texture, and prime before painting.
Take your time with those last steps. Installing the patch is often the easy part. Making it disappear is where a little patience pays off.
Planning Your Next Home Project?
Explore Builzee’s guides for DIY projects, Windows, Doors, Bathrooms and other home improvement topics before you start.