
How to Caulk a Bathtub or Shower: A Clean Step-by-Step Guide
Learning how to caulk a bathtub is less about the perfect squeeze of a caulk gun and more about what happens before the new bead goes down. Removing old silicone, drying the joint and choosing a compatible bathroom sealant are the parts that make the repair last.
This guide walks through replacing a failed tub or shower seal without covering up a bigger moisture problem. The same basic approach applies to many shower bases and tub-to-wall joints, but always check the particular surround and sealant manufacturer’s directions.
The order matters more than the trick
Remove → clean → dry → mask → apply → tool → cure. A neat bead applied over moisture, mildew or old silicone is still a weak joint. If the gap is moving, the wall is soft or water is getting behind the surround, fix that condition first.
When should bathtub or shower caulk be replaced?
Discoloration alone does not mean a seal has failed. Look for a bead that has cracked, pulled away from the tub or tile, become brittle, developed missing sections or trapped persistent moisture. If you can lift an edge of the bead, water may be reaching where it does not belong.
Replace the bead
The adjacent surfaces are sound, the gap is stable and the problem is limited to worn or separated sealant. Remove it fully and recaulk using an approved product.
Repair what is underneath
Soft drywall, rotten wood, loose tile, a moving tub or recurring leaks can indicate more than failed caulk. New sealant should never conceal damaged backing or a waterproofing issue.
Important for glass enclosures: Some channels and tracks include weep holes or designed drainage paths. Don’t seal an opening simply because it appears to be a gap; check the manufacturer’s installation details.
Which sealant works at a tub or shower?
For joints that are directly and repeatedly wetted, bathroom-rated 100% silicone is a common option because it remains flexible and highly water resistant. Some hybrid or siliconized acrylic products may be suitable in certain locations, but the substrate, movement and intended water exposure determine whether they are appropriate.
| Surface or situation | What to verify |
|---|---|
| Porcelain, ceramic or glazed tile | Wet-area approval, adhesion, movement capability and color compatibility. |
| Acrylic or fiberglass tub | Explicit compatibility with plastic or composite surfaces; avoid cleaning solvents that can damage the finish. |
| Natural stone or specialty coating | Check possible staining and manufacturer-approved sealant and cleaners. |
| Shower-door tracks or channels | Follow drainage and weep-hole detailing; some openings must remain unsealed. |
| Wide or deep joint | Use manufacturer-specified backing/joint geometry rather than filling the entire cavity with caulk. |
Gather a caulk gun, removal tool, plastic scraper, painter’s tape, microfiber cloths, suitable cleaner, gloves and a finishing tool. A trash bag and small brush help with old material. Use metal blades cautiously around finished tubs and surrounds.
For estimating the amount of sealant required, Builzee’s Sealant Calculator can help, but use the sealant manufacturer’s recommended joint design and coverage.
How to caulk a bathtub or shower in nine stages
Work along a manageable length of joint. Don’t rush through cleaning or drying just to apply the new bead before the room is ready.
Remove the old caulk
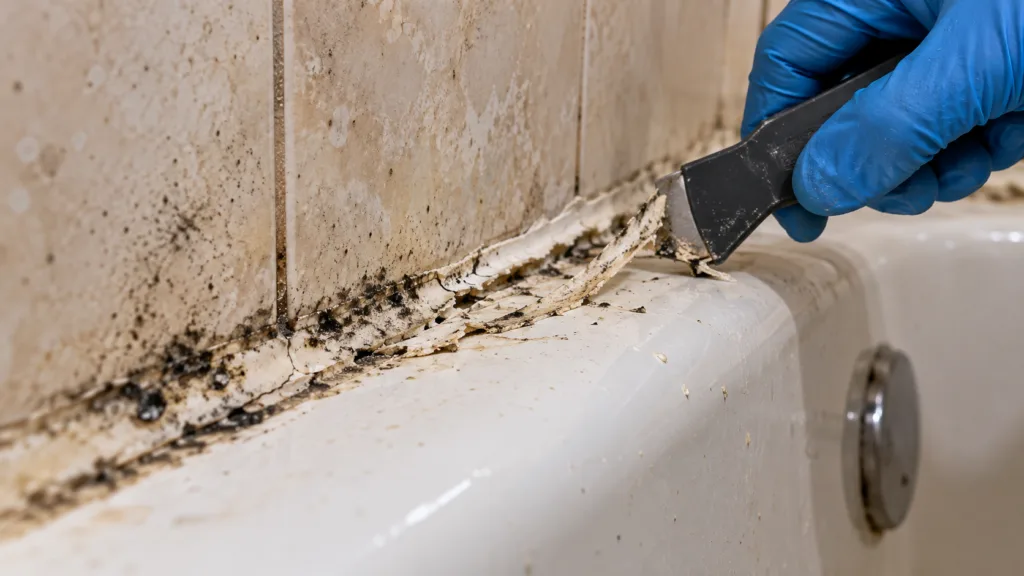
Cut carefully along both edges of the failing bead and pull it away. Some sections come out in strips; others need gentle work with a plastic scraper. Do not simply lay new silicone over old material. New sealant needs contact with clean surfaces.
Clear the thin residue
Inspect at close range. Old silicone can leave a thin film even after the main bead is removed. Use a compatible removal method, never aggressive scraping on acrylic, fiberglass or coated finishes.
Clean and let the joint dry
Remove soap film, body oils, loose grout, cleaner residue and mildew with an approved cleaner. Rinse thoroughly. Ventilate and allow the joint, corners and any small gaps to dry completely; hidden dampness can undermine adhesion.
If removal exposes wet backer, soft wall surfaces or mold beyond a small cleanable surface spot, investigate the moisture source before sealing.
Mask the edges if needed
Use painter’s tape for a controlled bead width on either side of the joint. Keep tape away from intentional drainage openings. The goal is a neat seal with adequate contact, not a very wide ribbon of silicone across both finishes.
Cut the nozzle conservatively
Cut the nozzle at about a 45-degree angle, starting with a small opening. Puncture the inner seal if the cartridge requires it. Test your bead on scrap before touching the actual tub.
Apply a continuous bead
Move the nozzle at a steady pace while applying even trigger pressure. Fill the joint enough to adhere to both sides without leaving voids or large piles. Break the work into short sections that can be tooled before a skin forms.
Tool to consistent contact and shape
With a clean, suitable caulk finishing tool, press the fresh material gently against both sides and shape a smooth, slightly concave profile. An extremely thin film has little movement capacity. Avoid repeatedly scraping away material just for appearance.

Pull tape while the sealant is fresh
Remove painter’s tape before the bead skins or cures. Make a quick final correction if necessary, then leave the surface alone. Excessive retooling can create ridges and weak spots.
Wait the full water-ready or cure period
Follow the exact product label. Some sealants permit water exposure sooner than others, and full cure may take longer depending on bead depth, temperature and humidity. A bead that feels dry on top may not be ready for a shower.
Common bathtub caulking mistakes and how to avoid them
Even a thin residue can affect adhesion. Remove old material using a method safe for the surface.
Allow corners and hidden gaps to dry, not merely the visible tub ledge.
Use appropriate joint geometry and enough material to maintain contact and accommodate movement.
Start small and enlarge only when needed. A huge bead wastes sealant and makes tooling harder.
Glass-enclosure channels may have intentional weeps. Never block them without checking details.
Obey the label’s water-ready time rather than estimating from surface appearance.
A clean rounded tool can shape a bead, but it cannot fix poor preparation or inadequate contact underneath. Likewise, don’t spray soapy water on fresh sealant unless its manufacturer approves that tooling method.
What if the gap is too large or the caulk keeps cracking?
Don’t keep adding thick layers of silicone over a changing gap. The joint may need proper backing, a different detail or correction of tub movement. If the base visibly shifts, the wall feels soft or moisture returns after each repair, have the underlying installation evaluated.
Final tub and shower caulking checklist
Bathtub caulking FAQs
Should I put new caulk over old caulk?
For a failed joint, no. Remove the old bead and residue to expose clean compatible surfaces.
Is silicone always better than acrylic caulk?
For frequently wet and moving joints, silicone is often appropriate, but the right choice depends on the product and substrate approvals.
Why does fresh caulk peel?
Common causes include residual old silicone, moisture, poor compatibility, inadequate contact or joint movement.
How long before I can shower?
Use the exact sealant manufacturer’s water-ready and full-cure instructions. There is no single safe waiting time for all products.
The lasting repair is the preparation
Remove failed sealant, confirm the joint is sound, choose the compatible product, form a continuous bead and let it cure. A nice-looking bead is a bonus; watertight adhesion is the job.