
Tub-to-Shower Conversion Cost: What to Know Before Remodeling
Tub-to-shower conversion cost depends on what happens behind the visible finishes. Removing a 60-inch bathtub might be straightforward; relocating a drain, rebuilding the waterproofing, changing the floor elevation or ordering a custom glass enclosure can turn the same footprint into a substantially larger project.
Use this guide to compare prefabricated and custom tiled conversions, identify the work that must be included, and build a realistic budget before demolition.
How Much Does a Tub-to-Shower Conversion Cost?
As a broad national planning range, tub-to-shower conversion projects commonly run approximately $2,000–$12,000, with complicated custom work potentially much higher. The starting price on an advertised conversion is rarely a reliable allowance for a fully tiled shower with custom glass.
Prefabricated shower
~$1,000–$8,000 installedOften uses a manufactured base and coordinated wall panels. Fewer individual layers and grout joints can reduce installation time and ongoing cleaning.
Watch for: separate plumbing, glass, trim, permits or hidden repair charges.
Tiled walk-in shower
~$3,500–$15,000+Allows custom tile, niche, bench and glass design, but requires coordinated pan construction, waterproofing, tile labor and more detailed scheduling.
Watch for: drain relocation, substrate repair, glass fabrication and curbless work.
These overlapping national planning ranges come from the existing Builzee article and its This Old House conversion-cost reference. They are not local quotes. Premium custom conversions can exceed $15,000, especially with significant structural or plumbing changes.
Can a Standard 60-Inch Bathtub Become a Walk-In Shower?
In many homes, yes. A common alcove bathtub occupies approximately 60 inches long by 30–32 inches deep. Keeping the shower in that same location can reduce changes to adjacent flooring and walls. But the replacement needs a dedicated shower base, correct drain connection and properly planned water containment.
The finished layout must account for clear entry, shower controls, glass and actual wall finishes. A 60-inch opening does not automatically allow a particular glass door width.
Hinged glass
Consider a fixed panel plus door where the wall has adequate backing and the door has appropriate safe swing clearance.
Sliding glass
Helpful when a door cannot swing into the bathroom, but leaves tracks, overlaps and hardware to maintain.
Open / curbless
Can be attractive, but a relatively shallow tub alcove may struggle with splash containment and floor-slope transitions.
For inspiration grounded in dimensions, compare Walk-In Shower Ideas. Custom glass should be measured after the tile and curb are finished, not ordered from rough framing alone.
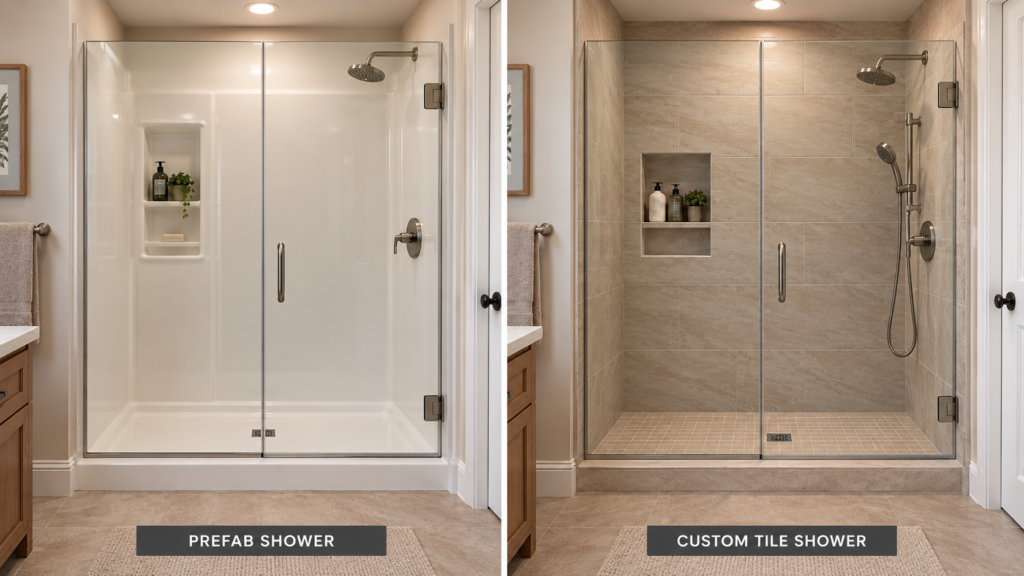
Prefabricated Shower vs. Custom Tiled Conversion
| Decision | Prefabricated system | Custom tiled shower |
|---|---|---|
| Initial budget | Often lower | Typically higher |
| Installation | Manufactured components | More site-built layers and trade coordination |
| Wall finish | Large acrylic, fiberglass or composite panels | Tile, grout and compatible waterproof substrate |
| Niches / benches | Limited to product-compatible options | Greater flexibility with added detailing |
| Cleaning | Fewer grout joints | More grout and finish maintenance |
| Glass | Standard or custom, depending on design | Often measured after tile completion |
A custom shower is not simply a prefabricated shower with more expensive tile. It is a different assembly, with slope, membranes, seams, transitions and penetrations that must perform as one water-management system.

Glass, Niches, Benches and Finish Choices
Custom frameless shower glass can be a major line item. The glass type and thickness, fixed-versus-moving panels, hinges, wall backing and opening clearances all affect installation. Do not assume a glass-to-glass hinge is interchangeable with a wall-mounted hinge or that a door can swing safely past a toilet or vanity.
Use upgrades selectively
A single recessed niche may be a worthwhile functional addition while the wall is open. A long niche or built-in bench needs more framing, waterproofing and tile work. Large-format tile reduces grout lines but requires suitably flat substrates.
Premium fixtures, natural stone, detailed patterns and curbless transitions may involve multiple trades. A simpler tile field with one carefully placed niche can be easier to execute and maintain.
Confirm a finished-opening field measurement, who supplies wall backing, what glass hardware is included, the direction of swing, and the installation sequence. Allow separate fabrication time for custom glass when required.
Five Common Tub-to-Shower Conversion Cost Drivers
Moving plumbing in concrete
A center-drain base can require concrete removal, piping modifications and slab repair when the existing tub drain is at one end. Existing wood floor joists can also limit the new routing. Changing a drain is not simply moving the visible strainer.
Changing the footprint
Widening a shower or expanding into adjacent flooring can require new framing, more tile, new waterproofing and a larger enclosure. Keeping the original alcove reduces, but does not eliminate, such risks.
Adding a bench or long niche
Built-in benches and oversized niches may need structural backing, waterproof detailing, extra tile and careful coordination with glass and plumbing. They also consume usable space in an already shallow shower.
Upgrading to curbless
Entry design may require lowering the shower floor, raising surrounding floor levels or using an approved transition. The surrounding bathroom may also need extended waterproofing and specific drainage details.
Concealed moisture repairs
Damage to framing, insulation or subflooring often becomes clear only during demolition. Agree on photo documentation and pricing approval before concealed repairs occur.
The most economical design is not always the one with the cheapest finish material. A simple shower system that fits the available drain and footprint can reduce the number of trades and the risk of finishing work outside the shower.
Example Tub-to-Shower Conversion Cost: Prefab vs. Custom Tile
The original Builzee article compares two hypothetical conversions of a 60-by-32-inch bathtub alcove. Both stay in the same basic footprint and exclude substantial hidden damage. Material and labor are included within each installation line item, rather than added twice.
| Work item | Prefab conversion | Custom tile conversion |
|---|---|---|
| Remove bathtub and dispose | $600 | $700 |
| Plumbing and fixture modifications | $1,000 | $1,200 |
| Manufactured base / walls + install | $2,500 | — |
| Site-built pan and waterproofing | — | $2,300 |
| Tile materials and installation | — | $4,700 |
| Glass and installation | $1,100 | $1,600 |
| Permits, trim and miscellaneous finish | $500 | $650 |
| Illustrative total | $5,700 | $11,150 |
Examples are constructed budgets to explain scope, not published averages for each line item or actual bids. Costs may be materially higher or lower based on location, existing conditions, equipment and finishing standards.
The key difference is scope and sequence. A tiled shower requires more waterproofing, surface preparation, finish labor and coordination. A new shower also may need revised exhaust ventilation, a new valve or electrical work not captured in either sample budget.
Schedule, Permits and Resale Considerations
A manufactured conversion can be relatively fast when preparation is straightforward, while custom tile and glass typically require more sequential steps: demolition, plumbing, inspections, membranes, curing, tile, grout, glass field measurement and glass fabrication. The installer should provide a project-specific schedule rather than promise a universal completion time.
Permits and inspections
Requirements vary by jurisdiction, especially for altered plumbing, structural work and major renovation. Confirm who applies for permits and schedules required inspections.
Resale and the last bathtub
Removing a tub can improve daily use, but consider whether the home will retain another bathtub. Families with young children may value one. Resale effects vary by market and buyer needs.
If the bathtub is useful and the budget is tight, updating the original tub surround or replacing fixtures may be more practical than converting the entire alcove.
Tub-to-Shower Contractor Estimate Checklist
Two proposals with the same project name can omit very different work. Compare the actual included scope and confirm how changes will be priced.
For each allowance, ask who carries the risk if the real item costs more. Good bids describe what is excluded and define a written approval process for concealed-condition work.
Price the Finished Shower, Not Just the Replacement Base
Keeping the shower in the existing bathtub alcove can reduce project disruption, but only a complete scope captures drain work, waterproofing, finishes, glass and any repairs. Choose the system based on daily use, maintenance, design priorities and total installed cost.
Further reading: This Old House conversion costs · Schluter curbless shower planning. This guide is general homeowner information; follow local building and plumbing codes and the selected waterproofing system’s instructions.