
BATHROOM WATERPROOFING & TILE
Keep Water Where It Belongs
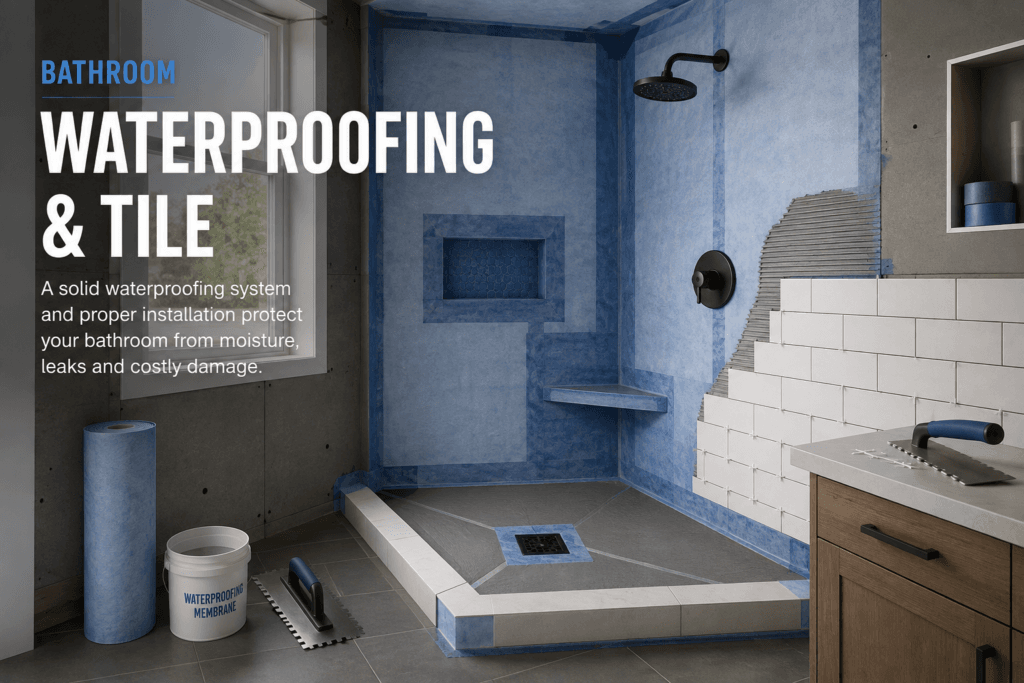
Tile may be the visible finish, but the waterproofing system behind it is what protects the bathroom. Learn how substrates, membranes, drains, penetrations, tile and grout work together to manage moisture and reduce the risk of leaks.
HOW THE SYSTEM WORKS
Waterproofing Is a Complete System, Not Just a Surface
Tile and grout are the visible finish, but they are not the primary waterproofing layer. A reliable bathroom assembly depends on the substrate, waterproofing membrane, corners and penetrations, shower pan, drain connection and finish materials all working together.
01
SUBSTRATE
The wall or floor surface must be stable, clean and suitable for the waterproofing system being used.
02
WATERPROOFING MEMBRANE
A sheet or liquid-applied membrane creates the primary water-resistant layer behind the finished tile.
03
CORNERS & PENETRATIONS
Seams, inside corners, plumbing penetrations and transitions need careful treatment because they are common leak points.
04
SLOPE & DRAINAGE
The shower floor must direct water toward the drain so moisture does not sit or migrate into surrounding construction.
05
TILE & FINISHES
Tile, grout and sealant complete the visible surface, but they depend on the waterproofing assembly beneath them.
STEP 01
Start With a Stable, Tile-Ready Substrate
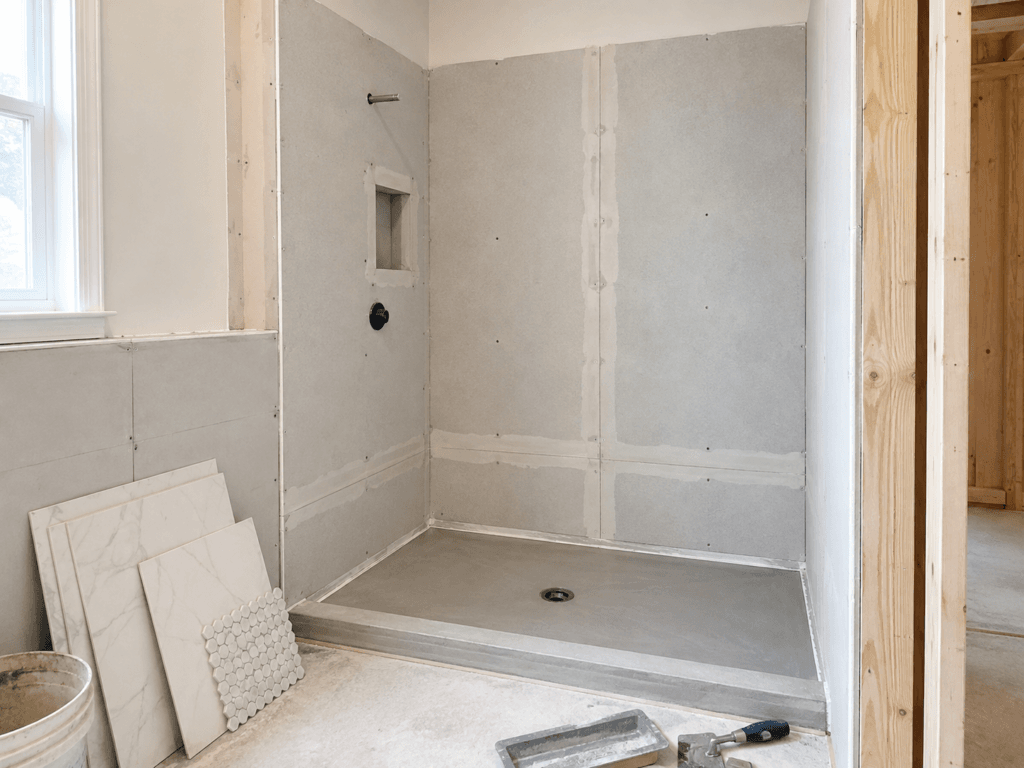
Waterproofing can only perform as well as the surface beneath it. Before a membrane is installed, walls and floors should be structurally sound, properly fastened, reasonably flat and compatible with the waterproofing system being used.
WHAT TO CHECK
Wall framing should be straight enough to support a flat finished surface, and damaged or deteriorated materials should be corrected before they are covered.
Common tile substrates may include cement backer board, approved foam boards or other manufacturer-approved panels. The correct substrate depends on the waterproofing and tile system being installed.
PREP BEFORE WATERPROOFING
- Secure loose panels or framing
- Correct excessive wall irregularities
- Clean dust and debris from the surface
- Confirm shower dimensions and drain location
- Prepare penetrations for valves, pipes and niches
- Follow the waterproofing manufacturer’s substrate requirements
GOOD TO KNOW
Cement backer board is not automatically a waterproofing layer. Even moisture-resistant substrates generally require a properly installed waterproofing system in wet areas such as showers.
STEP 02
Apply a Continuous Waterproofing Membrane
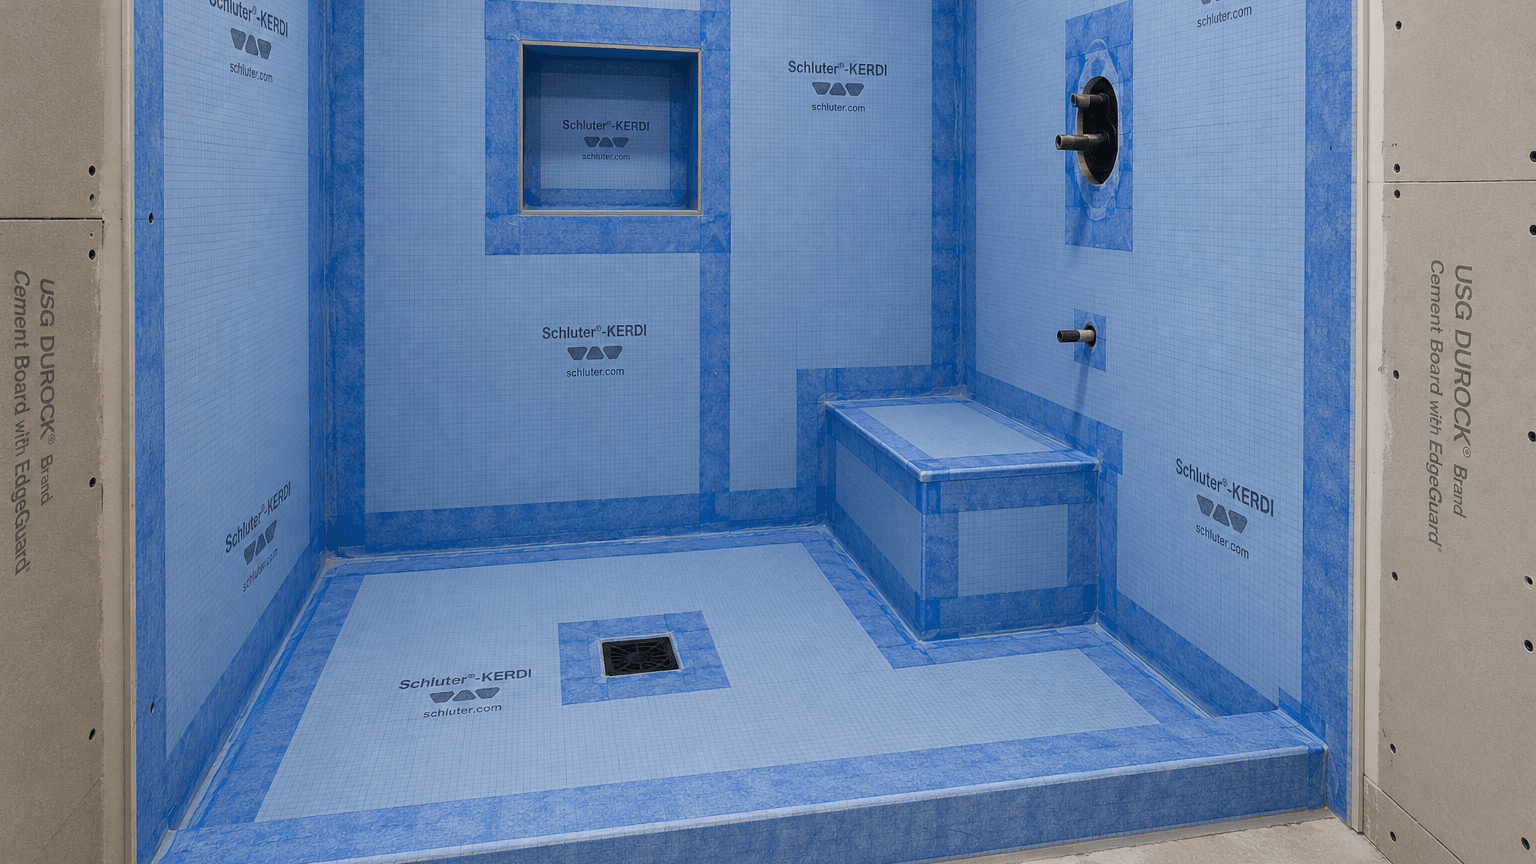
The waterproofing membrane is the primary layer that helps prevent water from reaching the structure behind the tile. It needs to form a continuous barrier across the shower walls, floor, corners and other wet-area transitions.
SHEET MEMBRANE
Sheet membranes are installed as continuous waterproof layers over the prepared substrate. Seams, corners and penetrations are treated with compatible accessories or overlap details so the system remains continuous.
LIQUID-APPLIED MEMBRANE
Liquid waterproofing is rolled, brushed or troweled onto the substrate and cures into a continuous membrane. Proper thickness, coverage and drying time are important for the system to perform as intended.
GOOD TO KNOW
Do not mix waterproofing products or installation methods unless the manufacturer specifically allows it. Membranes, seam treatments, primers, drains and accessories should be used as a compatible system.
STEP 03
Seal the Details Where Leaks Usually Start
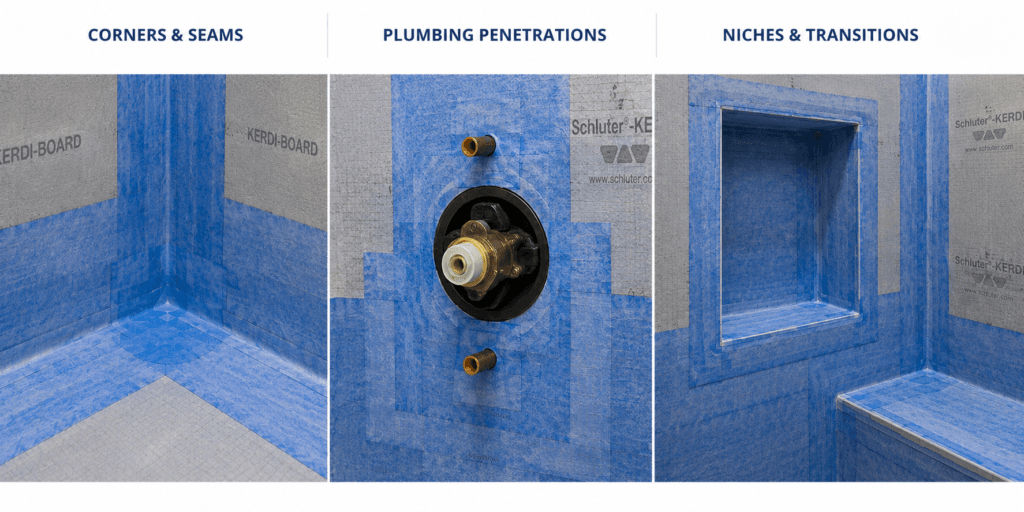
A waterproofing membrane only works if it remains continuous at corners, seams, niches and plumbing penetrations. These transitions are some of the most vulnerable parts of a shower assembly and should be detailed with compatible waterproofing materials before tile is installed.
CORNERS & SEAMS
Inside corners and membrane seams need to remain fully sealed while allowing the waterproofing layer to continue from one surface to the next. Use the seam treatment, overlap or reinforcing accessories required by the waterproofing system.
PLUMBING PENETRATIONS
Shower valves, pipe penetrations and other openings interrupt the waterproofing layer. These areas should be sealed with compatible collars, gaskets or membrane detailing so water cannot migrate behind the finished surface.
NICHES & TRANSITIONS
Recessed niches, benches, curbs and changes in plane create additional corners and joints. Each transition should be integrated into the waterproofing system rather than treated as a separate finished detail.
GOOD TO KNOW
Avoid relying on tile, grout or surface caulk alone to correct gaps in the waterproofing underneath. The water-management layer should already be continuous before the finish tile is installed.
STEP 04
Build the Shower Floor to Move Water Toward the Drain
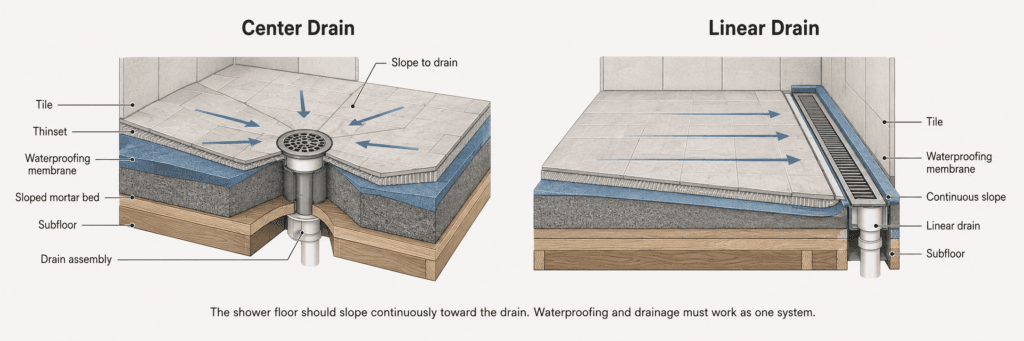
Waterproofing does not help much if water is allowed to sit on the shower floor. The shower pan, waterproofing membrane and drain should be designed as one system so water consistently moves toward the drain instead of collecting at corners or transitions.
SLOPE THE SHOWER FLOOR
The finished shower floor should slope continuously toward the drain without flat areas or reverse slopes. The slope begins below the tile, so it needs to be established during construction of the shower pan rather than corrected with tile or grout later.
- Consistent slope toward the drain
- No low spots where water can collect
- Proper transitions at walls and curbs
- Adequate slope around benches or ledges exposed to water
- A layout that works with the selected tile size
INTEGRATE THE DRAIN WITH THE WATERPROOFING
The drain is one of the most important transitions in the waterproofing system. The membrane should connect to a compatible drain assembly so water reaching the waterproofing layer is directed into the drainage system rather than beneath the shower.
- Drain compatible with the waterproofing system
- Continuous membrane connection
- Proper drain elevation
- Secure sealing at the drain flange or bonding surface
- No gaps around the drain penetration
GOOD TO KNOW
A centered drain often creates shorter and more uniform slopes, while linear drains can allow the floor to slope primarily in one direction. Either approach can work well when the shower pan, waterproofing and tile layout are coordinated from the beginning.
STEP 05
Install Tile Without Compromising the Waterproofing
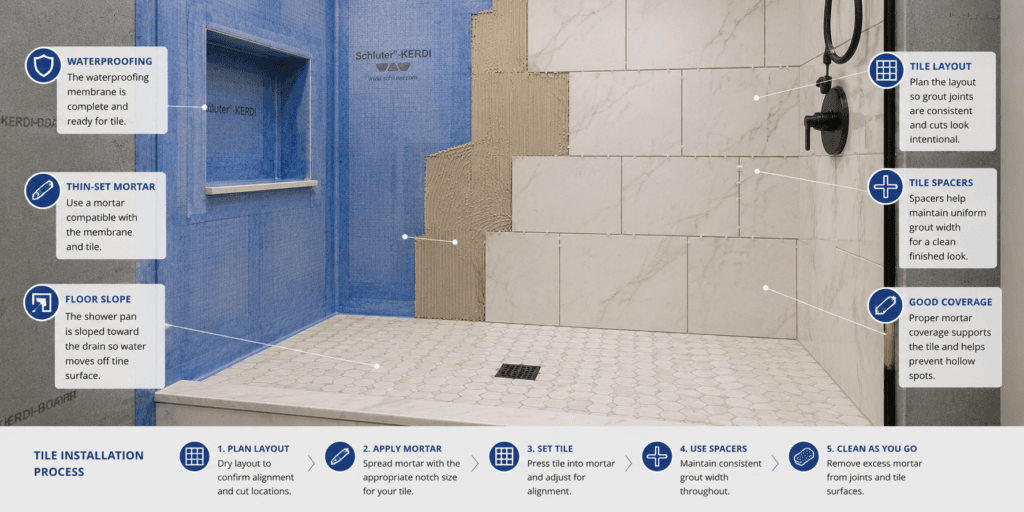
Once the waterproofing system is complete, tile becomes the finished wear surface. The goal is to install tile with good coverage, consistent alignment and properly planned joints without damaging the membrane underneath.
PLAN THE TILE LAYOUT
Before setting tile, establish the layout so cuts, grout joints, niches, corners and drain locations look intentional. Starting with a clear layout can reduce awkward slivers and help the finished shower look more balanced.
- Consistent grout-joint width
- Balanced cuts at corners
- Tile layout aligned with niches and fixtures
- Appropriate tile size for the shower floor
- Clean transitions between walls and floor
SET THE TILE PROPERLY
Use a mortar compatible with the tile and waterproofing system, and work carefully so the membrane is not punctured or damaged. Proper mortar coverage helps support the tile and reduce hollow areas behind the finished surface.
- Mortar compatible with the system
- Adequate mortar coverage
- Flat tile surfaces
- No loose or unsupported corners
- Clean joints before grout is installed
GOOD TO KNOW
Large-format wall tile can reduce the number of grout joints, while smaller tile is often easier to use on shower floors because it can follow the slope toward the drain more easily.
STEP 06
Finish the Tile Assembly Without Trapping Movement
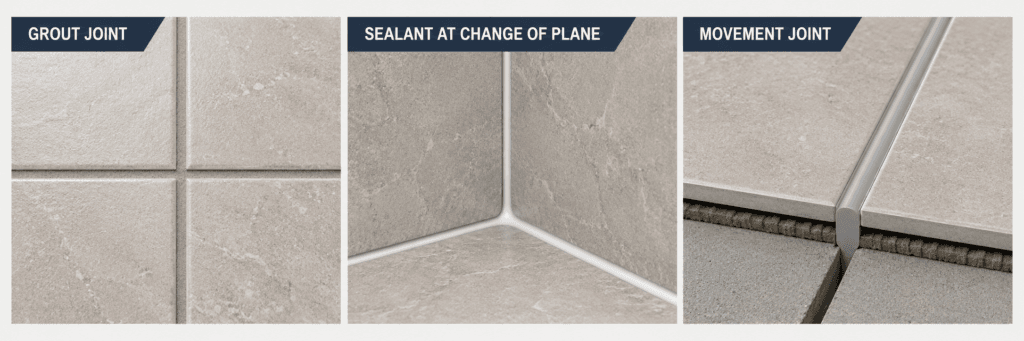
Grout fills the joints between tiles, while flexible sealant is used at changes of plane and other locations where movement can occur. Both need to be selected and installed appropriately so the finished surface performs well without relying on them as the primary waterproofing layer.
01 — GROUT
Grout fills the joints between adjacent tiles and helps create a finished, cleanable surface. The type of grout should be compatible with the tile, joint width and expected exposure to moisture.
02 — SEALANT
Flexible sealant is commonly used at inside corners, wall-to-floor transitions and other changes of plane where rigid grout may be more likely to crack as materials move.
03 — MOVEMENT JOINTS
Larger tiled areas and changes in substrate or geometry may require planned movement accommodation. These joints help reduce stress from expansion, contraction and building movement.
GOOD TO KNOW
Grout and surface sealant help complete the finished tile assembly, but they are not substitutes for proper waterproofing behind the tile.
AVOID THESE
Common Bathroom Waterproofing & Tile Failure Points
Waterproofing failures often begin at transitions, penetrations or installation details rather than in the middle of a tiled surface. These are some of the conditions worth checking carefully before the work is covered.
01 — INCOMPLETE WATERPROOFING
Gaps in membrane coverage, poorly treated seams or missed corners can allow moisture to reach the substrate behind the tile.
02 — POOR DRAINAGE
Flat areas, reverse slope or low spots can leave water sitting on the shower floor instead of moving consistently toward the drain.
03 — UNSEALED PENETRATIONS
Valves, pipes, niches and other openings interrupt the waterproofing layer. Improper detailing around these locations can create paths for water to move behind the finish.
04 — WRONG MATERIAL COMBINATION
Waterproofing membranes, mortars, drains and accessories are designed to work within specific systems. Mixing incompatible products or ignoring manufacturer requirements can compromise the assembly.
GOOD TO KNOW
Many waterproofing problems are hidden once tile is installed. Taking photos of the completed membrane, drain connection and critical details before tile work begins can provide a useful record of how the assembly was constructed.
BEFORE TILE GOES IN
Bathroom Waterproofing Checklist
Before tile installation begins, confirm that the waterproofing system is complete, continuous and properly integrated with the drain and surrounding construction.
☐ Substrate is stable and properly prepared
☐ Waterproofing membrane is continuous
☐ Inside corners and seams are fully treated
☐ Niches, benches and curbs are waterproofed
☐ Plumbing penetrations are sealed
☐ Shower pan slopes consistently toward the drain
☐ Drain is integrated with the waterproofing system
☐ No visible gaps, tears or damaged membrane
☐ Manufacturer-required cure or dry times are complete
☐ Tile mortar is compatible with the waterproofing system
☐ Critical waterproofing details are documented before tile
☐ Local requirements and manufacturer instructions have been reviewed
Bottom Line
A reliable tiled shower depends on the waterproofing assembly underneath the finish. Proper substrate preparation, continuous membrane coverage, careful detailing at penetrations and transitions, correct drainage and compatible materials all need to work together before tile is installed.