
BATHROOM PLUMBING, ELECTRICAL & VENTILATION
Plan What Goes Behind the Walls Before Finishes Begin
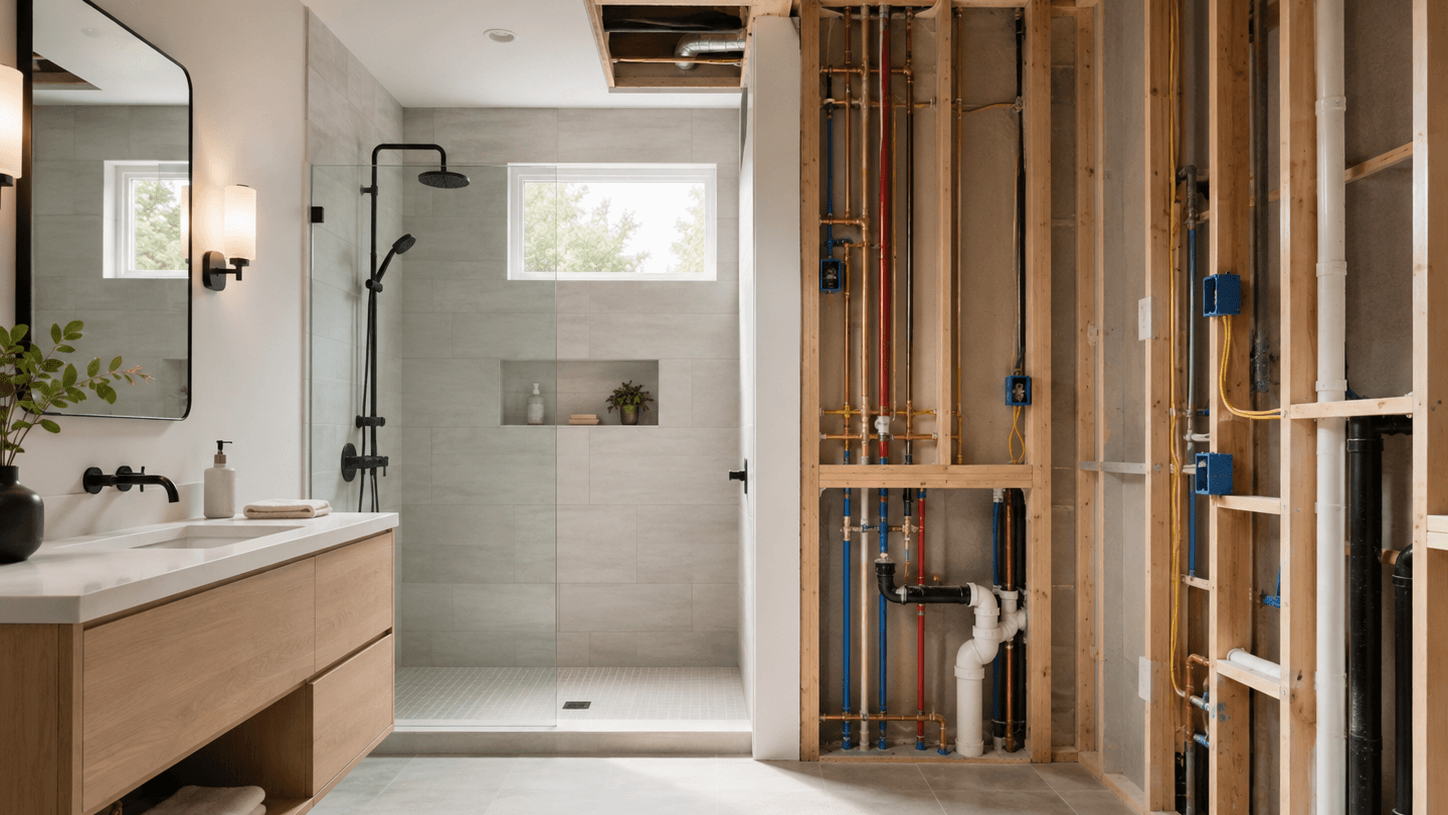
Bathroom plumbing, electrical and ventilation systems affect nearly every fixture in the room. Coordinate water and drain locations, outlets, lighting, exhaust fans and equipment requirements early so they do not conflict with cabinetry, mirrors, tile or other finishes.
HOW THE SYSTEMS WORK TOGETHER
Coordinate Plumbing, Electrical and Ventilation Before Construction
Bathroom systems compete for limited space inside walls, ceilings and cabinets. Plumbing pipes, electrical wiring, outlets, lighting and ventilation ducts should be coordinated together so one system does not interfere with another or with the finished fixtures.
01 — PLUMBING
Water supply, drainage and fixture locations.
Plumbing rough-ins establish where sinks, toilets, showers and tubs can be installed. Pipe size, drain location, venting and access requirements can affect wall framing, cabinetry and floor construction.
02 — ELECTRICAL
Power, outlets, lighting and controls.
Bathroom electrical planning includes receptacles, lighting, switches and power for equipment such as bidet seats, lighted mirrors or heated floors. Locations should be coordinated with vanities, mirrors, plumbing and wet areas.
03 — VENTILATION
Removing moisture from the room.
Exhaust ventilation helps move humid air outside after showers and baths. Fan location, duct routing and termination should be planned early, especially when ceiling space is limited.
GOOD TO KNOW
Moving a fixture after rough plumbing, wiring or ductwork is installed can affect several trades at once. Finalize the bathroom layout and major product selections before rough-in whenever possible.
STEP 01
Set Plumbing Rough-Ins Around the Final Fixture Layout
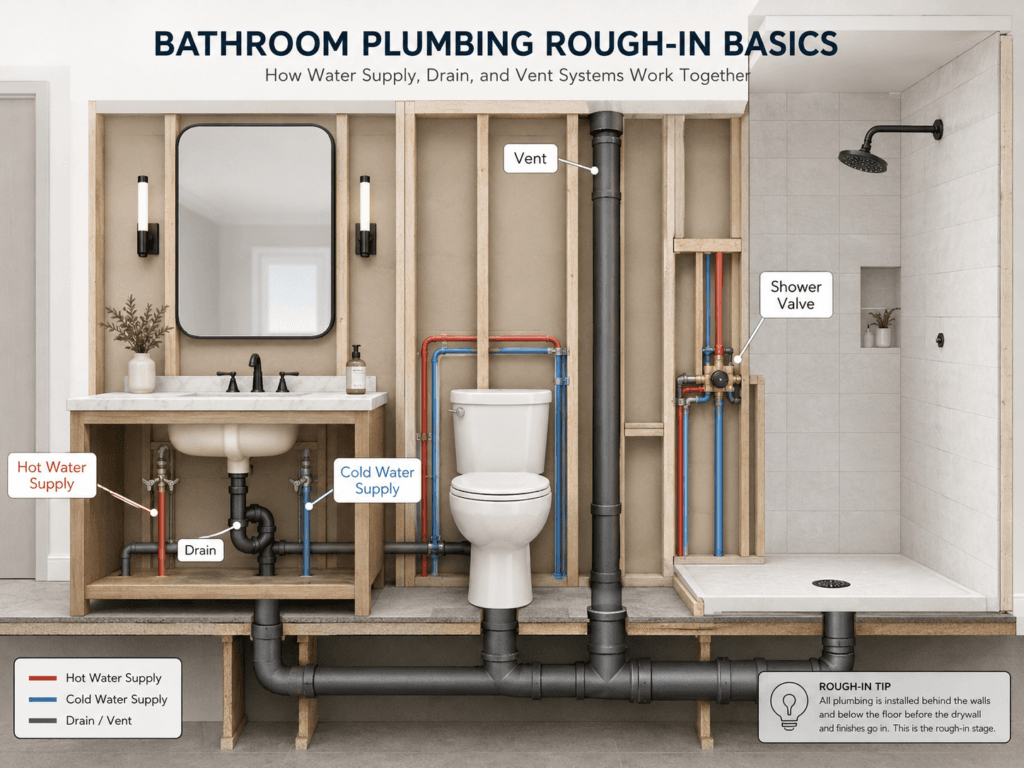
Plumbing rough-in determines where sinks, toilets, showers and tubs will actually connect. Before pipes are installed, confirm the final fixture locations, cabinet dimensions and manufacturer requirements so drains and water lines do not end up in the wrong place.
WATER SUPPLY LOCATIONS
Hot and cold water lines should be positioned to work with the selected fixture and remain accessible where service may be required. Vanity drawers, wall-mounted faucets and concealed valves can all affect where supply piping can run.
DRAINS & WASTE PIPING
Drain locations are often less flexible than water-supply lines because they depend on pipe size, slope and available framing space. Moving a toilet or shower drain can require considerably more work than shifting a faucet supply line.
PLUMBING VENTS
Drainage systems also need venting so fixtures can drain properly. Vent piping may share limited wall and ceiling space with electrical wiring, medicine cabinets, ducts and structural framing.
01 — VANITY
Confirm sink centerlines, cabinet depth and drawer configuration before locating the drain and water supplies.
02 — TOILET
Confirm the selected toilet and its required rough-in location before the finished wall and floor are established.
03 — SHOWER / TUB
Coordinate the drain, mixing valve, shower head, tub filler and any handheld fixtures with the finished tile layout and enclosure.
GOOD TO KNOW
Use the actual manufacturer drawings whenever possible. Fixtures that look similar can have different connection locations, installation depths and clearance requirements.
STEP 02
Plan Power Around the Fixtures and Equipment
Bathroom electrical planning should start with the actual products being installed. Receptacles, switches and dedicated power for mirrors, bidet seats, heated floors or other equipment need to be coordinated with plumbing, cabinetry and wet areas before the walls are closed.
RECEPTACLES
Vanity receptacles should be convenient to use without conflicting with mirrors, medicine cabinets, faucets or backsplash materials. Bathroom receptacles commonly require GFCI protection, but exact requirements depend on the applicable electrical code and local jurisdiction.
CIRCUITS & LOADS
Hair dryers, styling tools, heaters and other bathroom equipment can draw significant power. The electrical design should account for expected loads and any equipment that requires its own circuit or manufacturer-specified connection.
SWITCHES & CONTROLS
Coordinate switches for lighting, exhaust fans, heated floors and other features before tile or wall finishes are installed. Think about how someone will enter and use the bathroom rather than simply placing every control in one location.
WHAT MAY NEED POWER
☐ Vanity receptacles
☐ Lighted mirrors
☐ Mirror demister pads
☐ Medicine cabinet outlets
☐ Bidet or washlet seats
☐ Exhaust fans
☐ Heated flooring
☐ Towel warmers
☐ Accent or niche lighting
GOOD TO KNOW
Do not assume a product is plug-and-play. Some fixtures use a receptacle while others may require a hardwired connection, dedicated circuit or specific control. Review the manufacturer electrical requirements before rough-in.
SAFETY NOTE
Electrical work in bathrooms is subject to requirements for GFCI protection, circuiting and equipment locations near wet areas. Follow the applicable local electrical code and use a qualified electrician where required.
STEP 03
Layer Bathroom Lighting for Visibility and Comfort
A bathroom usually works best with more than one source of light. General lighting illuminates the room, task lighting improves visibility at the vanity, and accent lighting can highlight architectural features or provide softer nighttime illumination.
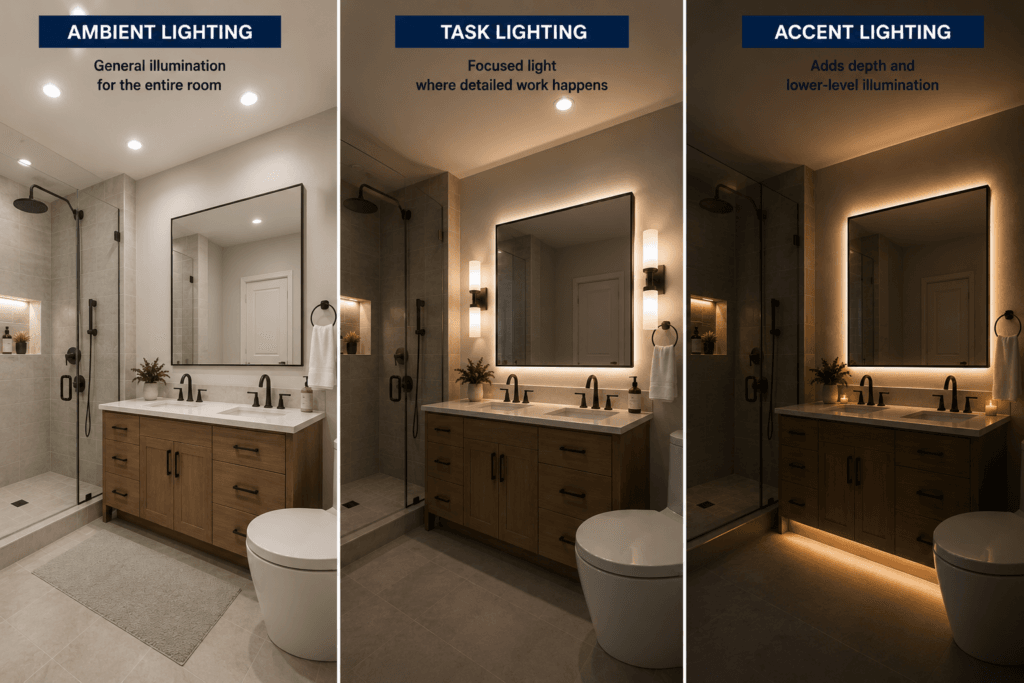
01 — AMBIENT LIGHTING
General illumination for the entire room.
Ceiling fixtures, recessed lights and other general lighting provide the base level of illumination. Fixtures should be arranged to reduce dark areas while avoiding unnecessary glare.
02 — TASK LIGHTING
Focused light where detailed work happens.
Vanity lighting should illuminate the face evenly for shaving, makeup and grooming. Light from the sides or front generally provides better facial illumination than relying only on a ceiling light directly overhead.
03 — ACCENT & NIGHT LIGHTING
Adds depth and lower-level illumination.
Backlit mirrors, toe-kick lighting, shower niches and other accent lights can add visual interest and provide softer illumination when full bathroom lighting is not needed.
GOOD TO KNOW
Color temperature and brightness affect how the bathroom feels and how accurately colors appear. Many homeowners prefer warmer light for overall comfort while using more neutral task lighting around the vanity.
PLAN AHEAD
Coordinate recessed lights, sconces and lighted mirrors with ceiling framing, medicine cabinets, shower glass and door swings before electrical rough-in. Wet or damp locations may also require fixtures specifically rated for those conditions.
STEP 04
Move Moisture Out of the Bathroom
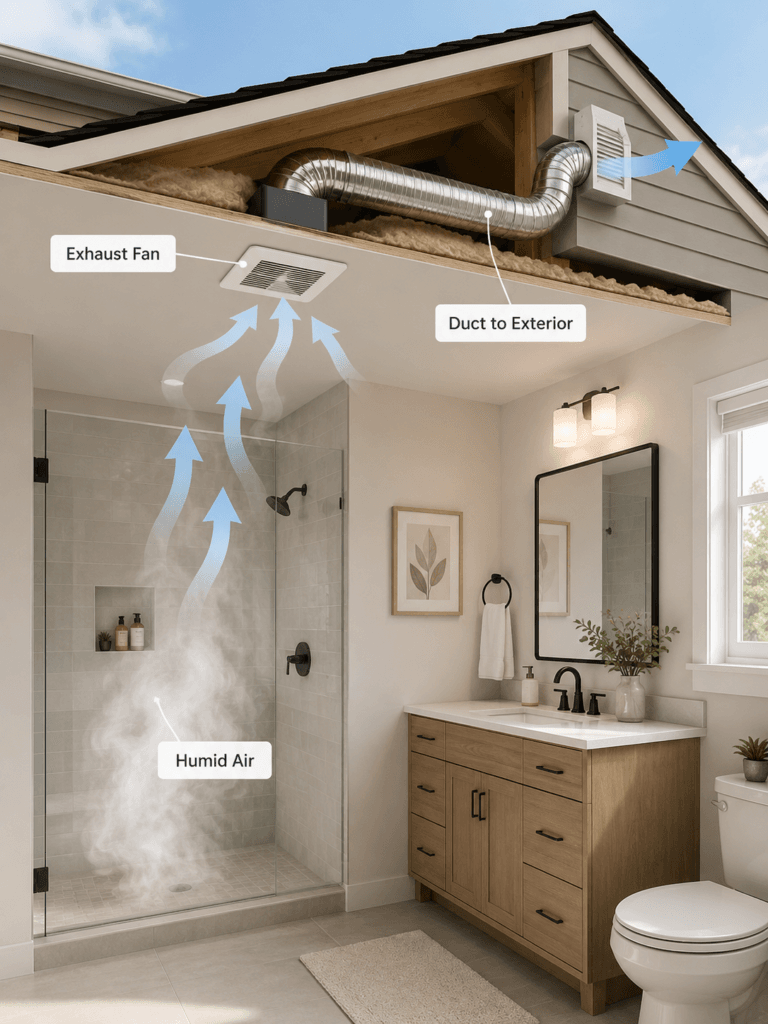
Showers and baths can create a large amount of humidity in a short time. A properly planned exhaust system helps remove that moisture before it collects on mirrors, walls, ceilings and other finishes.
FAN LOCATION
Place the exhaust fan where it can capture humid air effectively, typically near the shower or bathing area while still following the product’s installation and location requirements.
DUCT ROUTING
The fan should exhaust through ductwork to the outdoors rather than into an attic, ceiling cavity or other enclosed space. Shorter, smoother duct runs generally help the fan move air more efficiently.
FAN CAPACITY
Fan size should match the bathroom and the conditions it needs to handle. Larger rooms, enclosed toilet rooms, long duct runs or bathrooms with multiple bathing fixtures may require additional consideration.
CONTROLS
Fans can be controlled by a standard switch, timer, humidity sensor or other automatic control. A timer or humidity-sensing option can help the fan continue running after someone leaves the bathroom.
GOOD TO KNOW
A high-capacity fan can still perform poorly if the duct is undersized, excessively long, sharply restricted or poorly terminated. Treat the fan and ductwork as one ventilation system rather than separate components.
PLAN AHEAD
Coordinate the fan housing and duct route with ceiling framing, recessed lights, plumbing vents and other utilities before the ceiling is closed.
STEP 05
Plan Electrical Comfort Features Before Finishes Go In
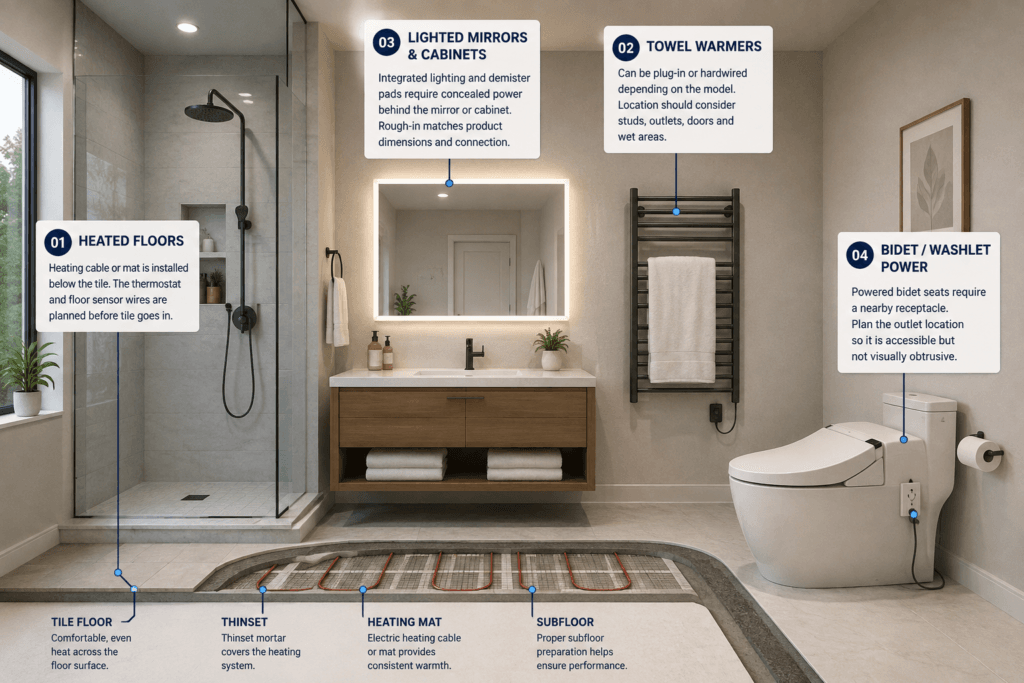
Some bathroom upgrades depend on electrical work that needs to be planned before tile, drywall or cabinetry is installed. Heated floors, towel warmers, lighted mirrors and bidet seats can all affect circuiting, controls and rough-in locations.
01 — HEATED FLOORS
Electric floor-warming systems are commonly installed below tile to add comfort in colder bathrooms. The heating cable or mat, thermostat location and sensor wiring should be coordinated before tile installation.
02 — TOWEL WARMERS
Wall-mounted towel warmers can be plug-in or hardwired depending on the model. Their location should be planned around studs, outlets, doors and nearby wet areas.
03 — LIGHTED MIRRORS & CABINETS
Integrated lighting, demister pads and internal outlets may require concealed power behind the mirror or medicine cabinet. Rough-in should match the actual product dimensions and connection location.
04 — BIDET / WASHLET POWER
Powered bidet seats and integrated toilets may require a nearby receptacle. Plan the outlet location so it is accessible but not visually awkward or in conflict with plumbing.
GOOD TO KNOW
Many of these upgrades are easy to add before walls and floors are finished but much harder to retrofit later. Even if you are not installing them immediately, planning conduit, power or blocking in advance can preserve future options.
AVOID THESE
Common Bathroom Rough-In Coordination Mistakes
Many bathroom problems are not caused by a bad product, but by systems being planned separately. Plumbing, electrical, ventilation, cabinetry and finishes should all be checked against the same final layout before rough-in is complete.
01 — ROUGH-INS BEFORE PRODUCTS
Installing plumbing or electrical rough-ins before final fixture selections can lead to drains, outlets, valves or controls ending up in the wrong location.
02 — UTILITIES CONFLICTING WITH CABINETRY
Pipes, outlets and wiring can interfere with vanity drawers, recessed medicine cabinets and other built-in storage if cabinet dimensions are not reviewed early.
03 — POOR DUCT ROUTING
An exhaust fan may not perform as expected when ductwork is excessively long, sharply bent, restricted or difficult to route around framing and other utilities.
04 — FORGETTING FUTURE FEATURES
Bidet power, heated floors, towel warmers and lighted mirrors are much easier to plan before finishes are installed. Adding power later can require opening completed walls or floors
GOOD TO KNOW
Before closing the walls and ceiling, compare the installed rough-ins with the final fixture drawings, vanity dimensions, mirror locations, lighting plan and ventilation route. This is one of the last easy opportunities to catch conflicts.
BEFORE THE WALLS CLOSE
Bathroom Rough-In Coordination Checklist
Before drywall, tile backer or other finishes cover the rough-in work, confirm that the plumbing, electrical and ventilation systems match the final bathroom layout and selected products.
☐ Vanity and sink locations match the cabinet drawings
☐ Water-supply and drain locations are confirmed
☐ Toilet rough-in matches the selected fixture
☐ Shower and tub valves are set at the correct locations
☐ Plumbing penetrations and vent routes are coordinated
☐ Receptacles are positioned around mirrors and cabinetry
☐ Power is provided for lighted mirrors or medicine cabinets
☐ Bidet or washlet power is planned where needed
☐ Heated-floor thermostat and sensor locations are confirmed
☐ Towel warmer power and blocking are coordinated
☐ Lighting locations match mirrors, showers and ceiling framing
☐ Exhaust fan location is confirmed
☐ Ventilation duct has a clear route to the exterior
☐ Rough-in locations have been checked against manufacturer drawings
GOOD TO KNOW
Photograph the plumbing, wiring, blocking and ductwork before the walls are closed. These photos can be useful later when mounting accessories, making repairs or planning future upgrades.
Bottom Line
Bathroom plumbing, electrical and ventilation systems should be planned together before walls, ceilings and floors are finished. Confirm the final fixture layout, product requirements, rough-in locations, power needs, lighting and exhaust route early so each system works without interfering with the others