
SIDING & EXTERIOR GUIDE
Understand How Siding Is Installed From the Wall Out
Learn how siding installation starts with wall preparation, weather barriers and flashing before moving into starter courses, fastening, clearances, joints and trim. Good installation details help siding drain, move and perform as intended.
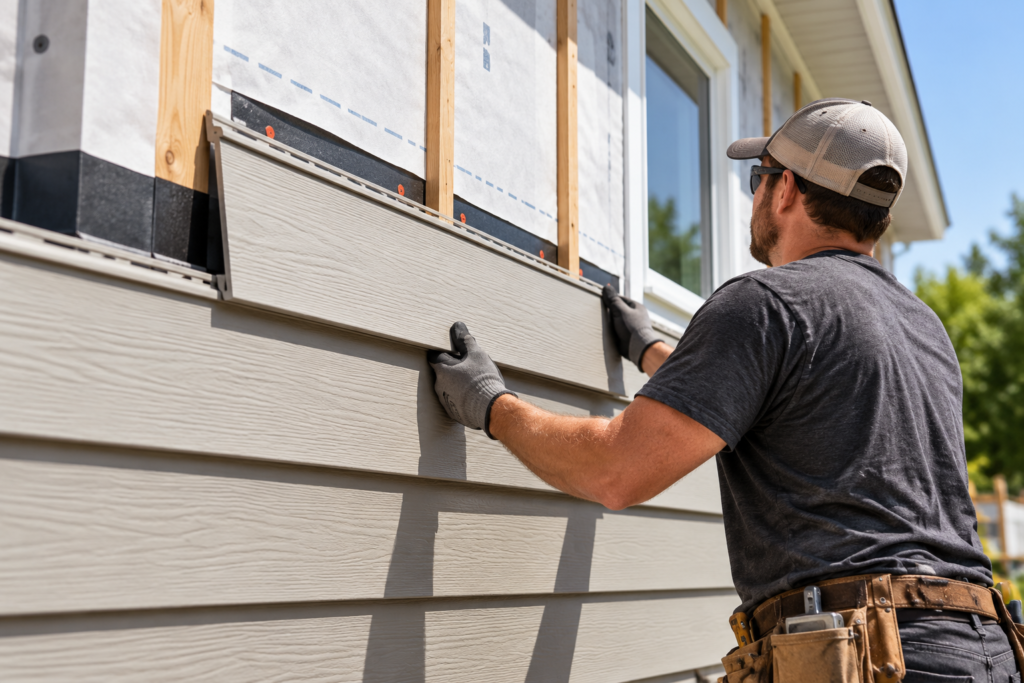
START WITH THE WALL
Prepare the Wall Before Installing Siding
Good siding installation starts before the siding itself is attached. The wall needs to be reasonably flat, dry and properly protected with weather barriers, flashing and trim details so the finished cladding has a stable surface and a clear drainage path.
01 — CHECK THE SHEATHING
Inspect the wall sheathing for damage, moisture problems, uneven areas or loose panels before covering it. Soft or deteriorated sheathing should be repaired rather than hidden behind new siding.
02 — COMPLETE THE WATER-RESISTIVE BARRIER
Install the water-resistive barrier (WRB) barrier so seams, corners and penetrations are properly integrated. The WRB should connect with window, door and roof flashing to direct water downward and outward.
03 — PLAN TRIM & TRANSITIONS
Corner boards, window and door trim, starter locations and transitions between materials should be planned before siding begins. Establishing these details early helps maintain consistent reveals, clearances and clean termination points.
GOOD TO KNOW
Installing new siding over an uneven or moisture-damaged wall rarely solves the underlying problem. Correct the substrate, flashing and drainage conditions first so the new exterior is not covering up an existing failure.
INSTALLATION SEQUENCE
How Siding Goes On the Wall
Once the wall is prepared, siding installation becomes a sequence of layout, fastening and detailing steps. The exact method varies by material, but the same basic principles apply across most systems.
01 — STARTER COURSE
The first course establishes the alignment for everything above it. Starter strips or the first siding course should be level and positioned so the required clearance above grade, roofs and hard surfaces is maintained.
02 — FASTENING
Siding needs to be secured according to the manufacturer’s fastening pattern and spacing. Some materials require room for movement, while others need specific fastener types, edge distances or attachment into framing.
03 — JOINTS & OVERLAPS
Lap joints, butt joints and panel seams should be arranged to shed water and accommodate movement. Joint treatment varies by material, so required gaps, flashing or sealant details should follow the siding system being installed.
04 — OPENINGS & TRIM
Windows, doors, corners, vents and other interruptions need clean termination details. Siding should integrate with trim and flashing without blocking drainage paths or forcing water toward the wall.
GOOD TO KNOW
A siding system should not be installed as tightly as possible. Many materials expand, contract or move slightly with temperature and moisture changes, so proper gaps and fastening are part of the installation, not signs of poor workmanship.
ESTIMATE SIDING MATERIALS
Before ordering siding, use the Siding Quantity Calculator to estimate how much material your exterior may require based on wall dimensions. Include an allowance for cuts, waste and project complexity, and verify final quantities against the coverage requirements of the siding product being installed.
CLEARANCES & MOVEMENT
Leave Room for Drainage and Material Movement
Siding performs better when it has the clearances and movement allowances required by the specific product. Installing siding too close to roofs, soil or hard surfaces can expose it to repeated moisture, while fastening or jointing it too tightly can lead to buckling, cracking or distortion.
01 — MAINTAIN CLEARANCES
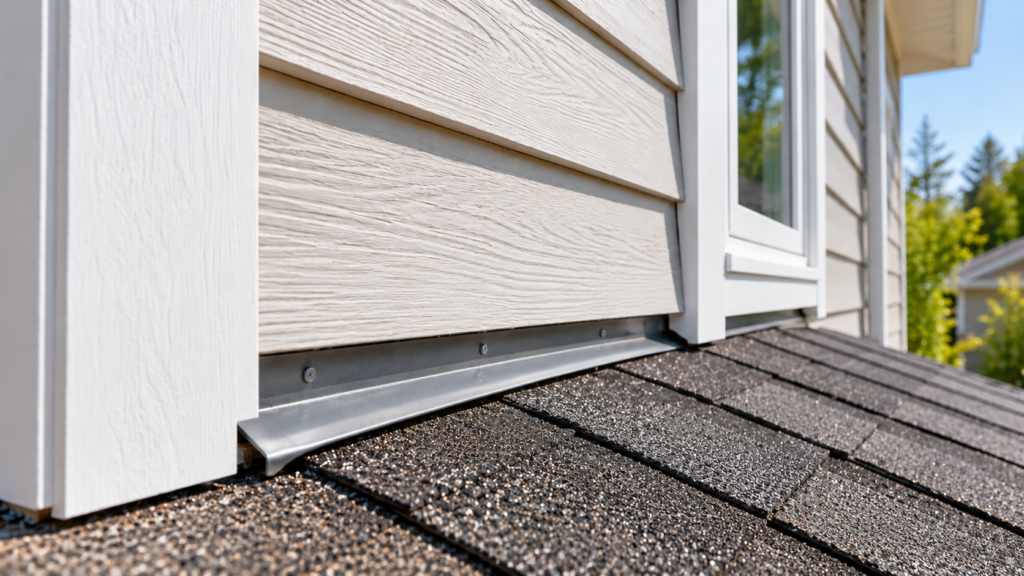
Siding should stay above grade, roofing, decks, patios and other horizontal surfaces according to the manufacturer’s requirements. These gaps help keep the material away from standing water, splashback and debris while preserving drainage at the bottom of the wall.
02 — ALLOW FOR EXPANSION & CONTRACTION
Vinyl, metal, engineered wood and other siding materials can move as temperature and moisture conditions change. Fasteners, joints and trim details need enough tolerance for that movement without allowing panels to become loose or unstable.
GOOD TO KNOW
Clearance requirements vary by siding material and manufacturer. Do not assume the same gap or fastening method applies to every product, especially at roof lines, masonry, decks and window or door trim.
FASTENERS & ATTACHMENT
Secure the Siding Without Restricting It
Fasteners do more than hold siding to the wall. Their type, spacing, placement and depth affect how well the siding stays attached while still allowing the material to move as temperatures and moisture levels change.
01 — USE THE RIGHT FASTENER
Nails, screws and other fasteners should be compatible with the siding material and local exposure conditions. Corrosion-resistant fasteners are especially important in wet, coastal or high-moisture environments.
02 — HIT SOLID BACKING
Fasteners should penetrate framing or approved structural backing as required by the siding manufacturer. Attaching only to weak or damaged sheathing can reduce wind resistance and lead to loose panels over time.
03 — DO NOT OVERDRIVE
Driving fasteners too tight can pinch vinyl, distort metal or crack more brittle siding products. The goal is secure attachment without preventing the siding from expanding, contracting or moving as designed.
GOOD TO KNOW
Fastener spacing and edge distances vary by product. Always follow the siding manufacturer’s installation requirements rather than assuming the same nailing pattern works for every material.
AVOID THESE
Common Siding Installation Mistakes
Most siding problems come from poor preparation, bad sequencing or installation details that interfere with drainage and material movement. These mistakes may not be obvious right away, but they can shorten the life of the exterior.
01 — INSTALLING OVER DAMAGED WALLS
New siding should not cover rot, wet sheathing or structural damage. Repair the wall first so the new exterior is not hiding an existing problem.
02 — FASTENING TOO TIGHT
Overdriven fasteners can restrict movement, distort panels or cause cracking. Materials such as vinyl and metal need enough freedom to expand and contract.
03 — IGNORING CLEARANCES
Siding installed too close to roofs, soil, decks or concrete can absorb splashback and moisture. Maintain the required gaps around horizontal surfaces and grade.
04 — POOR FLASHING AROUND OPENINGS
Windows, doors and penetrations need proper flashing before siding is installed. Caulk alone should not be relied on as the primary water-management detail.
05 — MISALIGNED COURSES & JOINTS
Uneven starter courses, inconsistent reveals or poorly planned seams can affect both appearance and performance. Layout should be established before fastening large areas of siding.
06 — BLOCKING DRAINAGE
Sealant, trim or tightly fitted siding can accidentally block paths where water is supposed to drain. The wall assembly should always allow incidental moisture to move downward and outward.
GOOD TO KNOW
Many installation failures are not caused by the siding material itself. They happen because the weather barrier, flashing, fastening or clearances were not detailed correctly before the wall was finished.
BEFORE YOU FINISH
Siding Installation Checklist
Before the project is considered complete, confirm the siding, flashing, trim and drainage details are all working together as intended.
☐ Wall sheathing is sound and dry
☐ Weather barrier is continuous and properly lapped
☐ Window and door flashing is complete
☐ Starter course is level and correctly positioned
☐ Siding clearances are maintained above roofs, grade and hard surfaces
☐ Fasteners are the correct type and spacing
☐ Fasteners are not overdriven
☐ Joints and overlaps follow manufacturer requirements
☐ Trim and corner details are secure
☐ Drainage paths remain open
☐ Penetrations are properly flashed or sealed
☐ Siding can expand and contract where required
Bottom Line
Good siding installation depends on much more than keeping the courses straight. Wall preparation, weather barriers, flashing, fastening, clearances and material movement all affect how well the finished exterior performs.
The best results come from treating siding as part of a complete wall system rather than as a decorative surface. Proper installation helps water drain, allows materials to move naturally and reduces the chance of hidden moisture or premature failure.