
KITCHEN REMODELING & INSTALLATION
Understand the Order of Work Before Remodeling Your Kitchen
Kitchen remodeling and installation involve multiple trades and decisions that need to happen in the right sequence. Understanding demolition, rough plumbing and electrical, cabinets, countertops, flooring and finish work can help you plan the project and avoid costly rework.
START WITH THE BASICS
Understand the Sequence Before Construction Starts
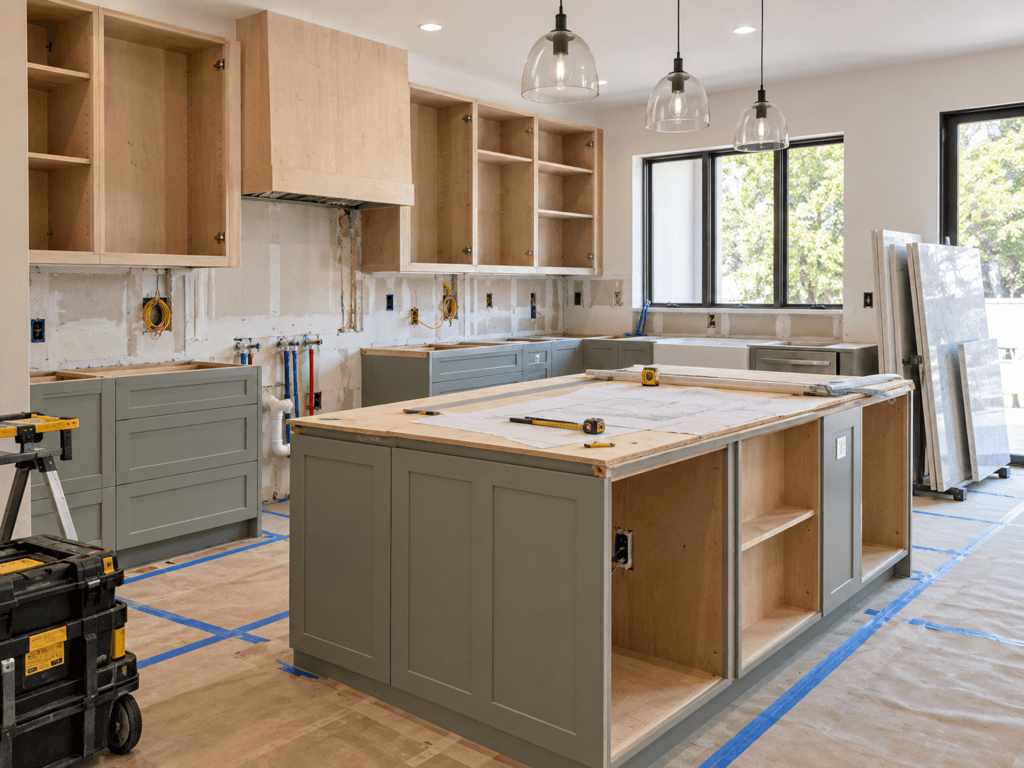
A kitchen remodel involves several trades working in a specific order. Demolition, framing, plumbing, electrical, ventilation, drywall, cabinets, countertops, flooring and finish work all affect what can happen next.
Before construction begins, confirm the layout, major appliances, cabinet plan, plumbing locations, electrical requirements and ventilation route. Changes made after rough work or cabinets are installed can create delays, added labor and unnecessary rework.
A clear sequence also helps you understand which decisions need to be finalized early and which finishes can wait until later.
PROJECT SEQUENCE
Typical Order of a Kitchen Remodel
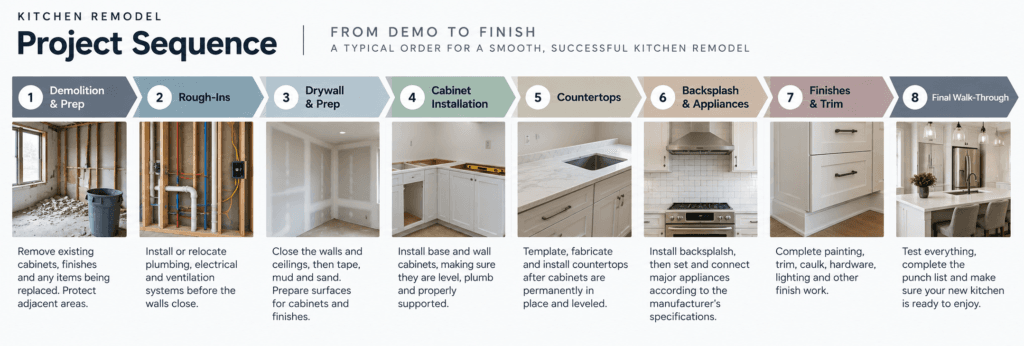
Every project is different, but most kitchen remodels follow a similar sequence. Understanding the general order helps homeowners know which decisions need to happen early and which trades depend on work being completed before they can begin.
01 — DEMOLITION & SITE PREP
Remove cabinets, countertops, appliances and finishes that are being replaced. Protect adjacent rooms, floors and remaining surfaces before demolition begins.
02 — FRAMING & STRUCTURAL WORK
Complete wall changes, new openings, blocking and structural modifications before mechanical rough-ins and finishes are installed.
03 — ROUGH PLUMBING, ELECTRICAL & HVAC
Relocate plumbing, install new circuits and outlets, prepare appliance connections and complete ventilation or ductwork while walls are still open.
04 — INSPECTIONS & WALL CLOSURE
Required rough inspections typically happen before insulation, drywall and wall finishes cover the work. Repair and prepare walls once the rough systems are approved.
05 — FLOORING & CABINET INSTALLATION
The exact order can vary by flooring type and project conditions. Cabinets must be installed level, secure and in the correct locations before countertop templating.
06 — COUNTERTOP TEMPLATE & INSTALLATION
Once base cabinets are permanently installed, the fabricator can field-measure or template the countertops. Sinks, faucets and cooktops should already be selected.
07 — BACKSPLASH, APPLIANCES & FINISH WORK
Install backsplashes, appliances, plumbing fixtures, lighting, cabinet hardware and other finish components after the major surfaces are in place.
08 — FINAL CONNECTIONS & PUNCH LIST
Complete electrical, plumbing and appliance connections, test equipment and ventilation, make final adjustments and correct remaining finish items.
GOOD TO KNOW
The exact sequence can change based on flooring type, inspections, cabinet construction, countertop lead times and local requirements. The important part is coordinating the trades so finished work does not need to be removed or redone.
DEMOLITION & PREP
Start Clean Without Creating New Problems
Demolition is more than removing cabinets and countertops. A good start protects the parts of the home that are staying, exposes hidden conditions early and gives the trades a clean workspace for the next phase.
WHAT TO REMOVE
What usually comes out during kitchen demolition?
Depending on the scope, demolition may include cabinets, countertops, backsplash, flooring, appliances, drywall and selected framing.
Remove only what is part of the approved remodel. Plumbing, electrical, structural elements and anything that may contain hazardous materials should be evaluated before work begins.
WHAT TO PROTECT
What should stay protected during construction?
Protect adjacent flooring, doorways, stairs and finished rooms before demolition starts. Isolate dust where practical and establish a clear path for workers, tools and debris.
Existing windows, doors, appliances or finishes that will remain should be covered and clearly identified so they are not damaged during construction.
GOOD TO KNOW
Demolition often reveals conditions that were impossible to see beforehand, including water damage, uneven framing, outdated wiring or plumbing issues. Leave some flexibility in the schedule and budget for conditions uncovered once the kitchen is opened up.
ROUGH-IN WORK
Coordinate Plumbing, Electrical and Ventilation Before the Walls Close
Once demolition and framing are complete, the mechanical systems can be moved or upgraded. This is the best time to coordinate appliance connections, sink locations, outlets, lighting and ventilation while the walls and ceilings are still open.
01 — PLUMBING
What needs to be finalized before rough plumbing begins?
Confirm the sink, dishwasher, refrigerator water line and any relocated drains or supply lines. Moving plumbing can affect cabinets, flooring and wall framing, so locations should match the final kitchen plan before walls are closed.
02 — ELECTRICAL
Why does the electrical plan need to follow the appliance plan?
Ranges, wall ovens, microwaves, refrigerators, dishwashers and other equipment may require dedicated circuits or specific outlet locations. Coordinate countertop outlets, island power, lighting, switches and appliance connections before drywall.
03 — VENTILATION & HVAC
What should be coordinated while the ceiling and walls are open?
Plan the range-hood duct route, exterior termination and any required makeup air before finishes are installed. Also check whether supply or return air locations need to move because of new cabinets, soffits or ceiling changes.
GOOD TO KNOW
This is also the time to photograph open walls before insulation and drywall. Those photos can be useful later for locating pipes, wires, blocking and ductwork behind finished surfaces.
CABINET INSTALLATION
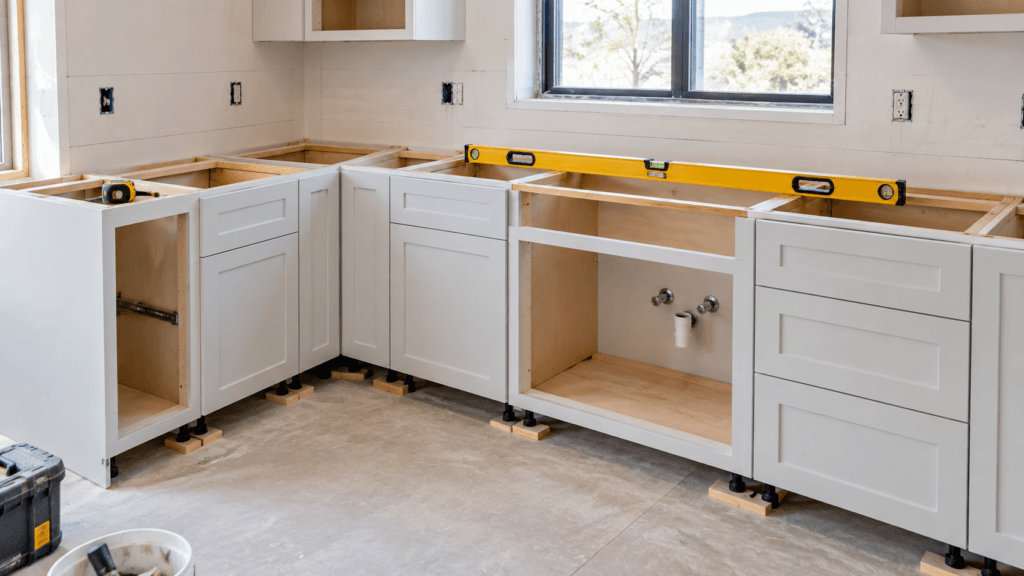
Cabinets Need to Be Level, Plumb and Properly Supported
Cabinet installation sets the foundation for countertops, appliances and finish work. Small alignment problems can become much more noticeable once doors, drawers, countertops and backsplash are installed.
LEVEL & PLUMB
Why does cabinet alignment matter so much?
Base cabinets need to be installed level so countertops sit properly and appliances fit as intended. Wall cabinets should be plumb, securely anchored and aligned with adjacent doors, panels and trim.
Floors and walls are rarely perfectly straight, so installers may need shims and adjustments to create a clean finished line.
FILLERS & FIELD CONDITIONS
Why are fillers and adjustments sometimes necessary?
Walls, corners and appliance openings do not always match the drawings exactly. Fillers, scribes and finished panels help compensate for field conditions while maintaining door and drawer clearances.
These pieces should be planned before installation so the finished kitchen looks intentional rather than patched together afterward.
GOOD TO KNOW
Countertop templating should generally happen only after the base cabinets are permanently installed and correctly leveled.
FINISH INSTALLATION
Complete the Major Surfaces in the Right Order
Once the cabinets are installed, the kitchen starts moving from construction to finished work. Countertops, backsplash, appliances and trim need to be coordinated so one trade does not damage or block another.
01 — COUNTERTOP TEMPLATE & INSTALLATION
What needs to be ready before countertops are measured?
Base cabinets should be permanently installed, level and in their final positions before templating. Sink, faucet and cooktop selections should also be finalized so cutouts and openings can be coordinated accurately.
After fabrication, countertops are installed and seams, overhangs and cutouts should be checked before the next finish work begins.
02 — BACKSPLASH & FINISH SURFACES
When should the backsplash be installed?
Backsplash installation typically follows the countertops so the finished joint can be coordinated cleanly. Tile, slab panels and painted finishes may each require different preparation, layout and curing time.
Protect newly installed countertops while backsplash, grout, caulk and painting work is completed.
03 — APPLIANCES, HARDWARE & TRIM
What usually happens near the end of the project?
Major appliances, plumbing fixtures, cabinet hardware, decorative lighting and finish trim are installed once the surrounding surfaces are ready.
Doors and drawers are adjusted, appliance panels and fillers are aligned, and final caulking or touch-up work is completed before the kitchen is turned over.
GOOD TO KNOW
The last phase often takes longer than expected because many small items need to be adjusted, connected or corrected. Leave room in the schedule for final alignment and punch-list work.
FLOORING & FINISH COORDINATION
Plan Flooring Around the Cabinet and Appliance Strategy
Flooring can be installed before or after cabinets depending on the material, project conditions and installer requirements. The important part is deciding the sequence before cabinet heights, appliance openings and finished floor elevations are finalized.
FLOORING BEFORE CABINETS
When does flooring go in first?
Some projects install finished flooring wall to wall before cabinets. This can create a continuous surface and make future cabinet changes easier, but the flooring must be protected carefully during cabinet installation.
The added floor thickness also needs to be considered so appliances, toe kicks and cabinet heights remain correct.
FLOORING AFTER CABINETS
Why are cabinets sometimes installed first?
In other projects, cabinets are installed before the finished flooring and the flooring terminates at the cabinet base. This can reduce the amount of material used and may be preferred with certain floating floors or manufacturer requirements.
Transitions, toe kicks and appliance clearances still need to be coordinated so the finished floor does not create installation problems later.
GOOD TO KNOW
There is no single flooring sequence that works for every kitchen. Follow the flooring manufacturer’s installation requirements and coordinate finished floor thickness with cabinets, dishwashers, refrigerators and other appliances before work begins.
AVOID THESE
Common Kitchen Remodeling & Installation Mistakes
Most kitchen installation problems come from poor coordination rather than one bad product. Check these issues early so trades are working from the same plan and finished work does not need to be removed or redone.
01 — STARTING BEFORE DECISIONS ARE FINAL
Changing appliance models, cabinet sizes, plumbing locations or finishes after construction begins can create delays and rework. Finalize major selections before rough work and cabinet production whenever possible.
02 — POOR TRADE COORDINATION
Plumbing, electrical, HVAC, cabinets and countertops all depend on one another. If one trade works from outdated information, small conflicts can turn into expensive field changes.
03 — TEMPLATING COUNTERTOPS TOO EARLY
Countertops should not be measured until the base cabinets are permanently installed, level and in their final positions. Early templating can lead to poor seams, incorrect overhangs or cutout problems.
04 — IGNORING FINISHED FLOOR HEIGHT
Flooring thickness can affect dishwashers, refrigerators, toe kicks and cabinet elevations. Coordinate the finished floor before cabinets and appliances are locked in.
05 — NOT PROTECTING FINISHED WORK
New cabinets, countertops, flooring and appliances can easily be damaged by later trades. Protect completed surfaces as the project moves into backsplash, painting, trim and final connections.
06 — RUSHING THE FINAL PUNCH LIST
Misaligned doors, loose hardware, incomplete caulking, chipped finishes and appliance adjustments are common near the end of a remodel. Walk the kitchen carefully and correct the small items before calling the project complete.
GOOD TO KNOW
A detailed punch list is normal on a renovation project. The goal is not to avoid every adjustment, but to catch and correct issues before the kitchen is fully turned over.
BEFORE CONSTRUCTION
Kitchen Remodeling & Installation Checklist
Before demolition starts, confirm the drawings, selections, trade responsibilities and construction sequence. The more decisions that are resolved in advance, the fewer expensive changes you are likely to face during the remodel.
□ Final kitchen layout is approved
□ Cabinet drawings and dimensions are confirmed
□ Major appliances are selected
□ Plumbing fixture locations are finalized
□ Electrical and lighting plans are coordinated
□ Range hood and duct route are planned
□ Flooring material and installation sequence are confirmed
□ Structural changes are identified
□ Required permits and inspections are understood
□ Demolition scope is clearly defined
□ Adjacent rooms and floors will be protected
□ Cabinet lead times are confirmed
□ Countertop material and fabricator are selected
□ Sink, faucet and cooktop are ready before templating
□ Backsplash material is selected
□ Delivery access for cabinets and slabs is confirmed
□ Trade responsibilities are clearly assigned
□ Temporary kitchen arrangements are planned if needed
□ Allowance is included for hidden conditions
□ Final punch-list process is understood
Bottom Line
A successful kitchen remodel depends on more than choosing good products. The order of work, trade coordination, field measurements and timing all affect the final result.
Finalize the major decisions before construction begins, keep the trades working from the same plan and protect completed work as the project moves from demolition through finish installation.