
ROOF ANATOMY & COMPONENTS
Understand How the Parts of a Roof Work Together
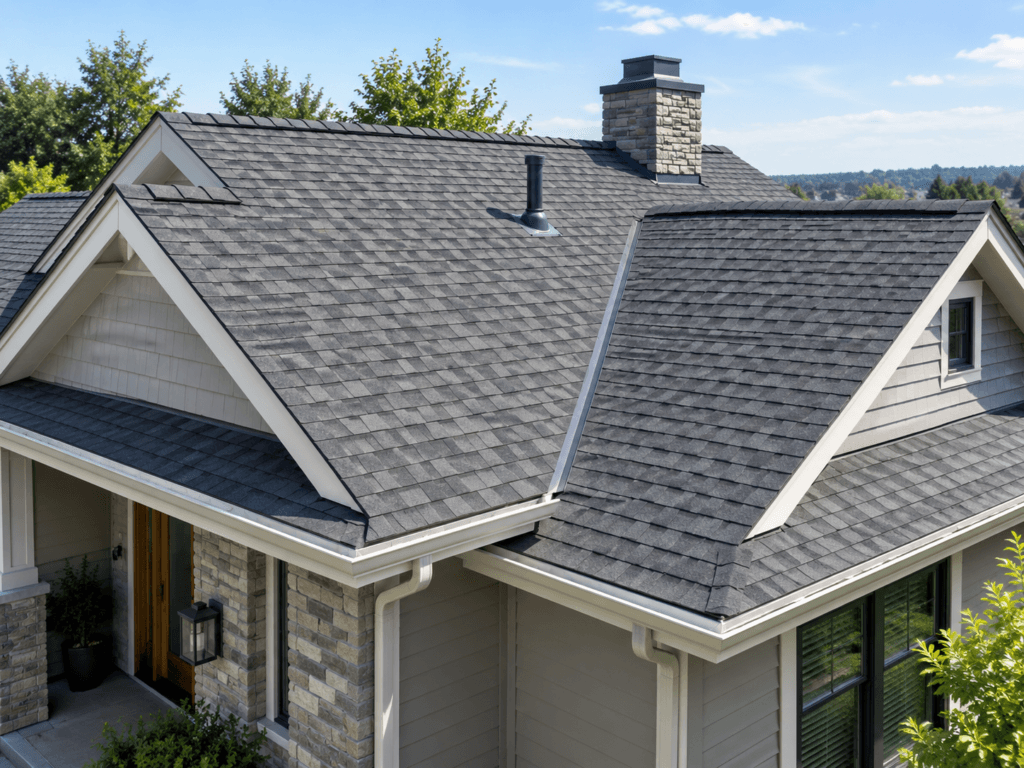
A roof is more than shingles or tile. Decking, underlayment, flashing, valleys, edges, ventilation and penetrations all work together to manage water, support the roof covering and protect the home below. This guide breaks down the main parts of a roof so you can better understand repairs, replacement work and contractor recommendations.
ROOF STRUCTURE BASICS
Understand the Layers That Make Up a Roof
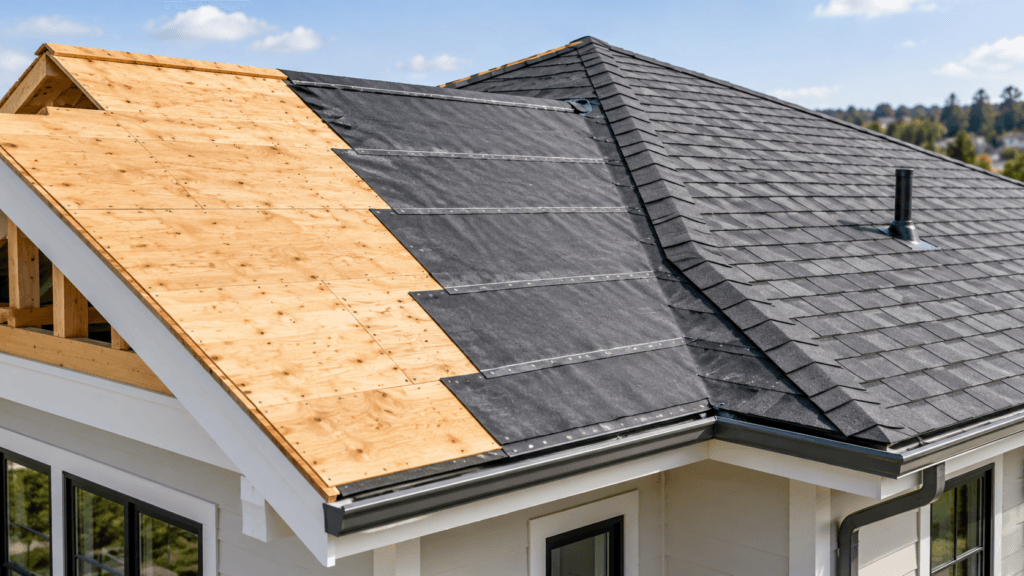
A roofing system is built in layers. The visible shingles, tile or metal are only the outer surface. Beneath them, the roof deck provides structural support while underlayment and water-resistant membranes add another layer of protection against moisture.
01 — ROOF DECKING
The roof deck is the structural surface attached to the rafters or trusses and provides the base for the roofing system. Most modern homes use plywood or oriented strand board (OSB), while older homes may have plank decking.
WATCH FOR
Soft areas, sagging, rot, delamination, damaged panels or sections that no longer provide a solid fastening surface.
02 — UNDERLAYMENT
Underlayment is installed over the roof deck and beneath the finished roofing material. It provides secondary protection against water that gets past shingles, tile or metal roofing. Common materials include asphalt-saturated felt and synthetic underlayment, with specialized self-adhered membranes often used in more vulnerable areas.
WATCH FOR
Tears, improper overlaps, exposed areas or damaged underlayment discovered during roof replacement.
03 — ROOF COVERING
The roof covering is the visible exterior layer that receives direct exposure to sun, rain, wind and other weather. This may include asphalt shingles, metal, tile, slate, composite products or low-slope membranes. Its job is to shed water while protecting the layers beneath it.
WATCH FOR
Missing or damaged shingles, cracked tile, loose panels, lifted edges, excessive wear or deterioration around penetrations and roof transitions.
GOOD TO KNOW
The finished roofing material is only one part of the system. A roof can look relatively good from the outside while damaged decking, deteriorated underlayment or poor detailing exists underneath. During a replacement, removing the existing roof covering is often the first opportunity to fully inspect these concealed layers.
WATER MANAGEMENT
Direct Water Away From Vulnerable Roof Areas
Most roof leaks begin at transitions rather than in the middle of an uninterrupted roof surface. Valleys, flashing and roof edges are designed to control runoff and keep water from reaching joints, openings and changes in roof geometry.
01 — ROOF VALLEYS
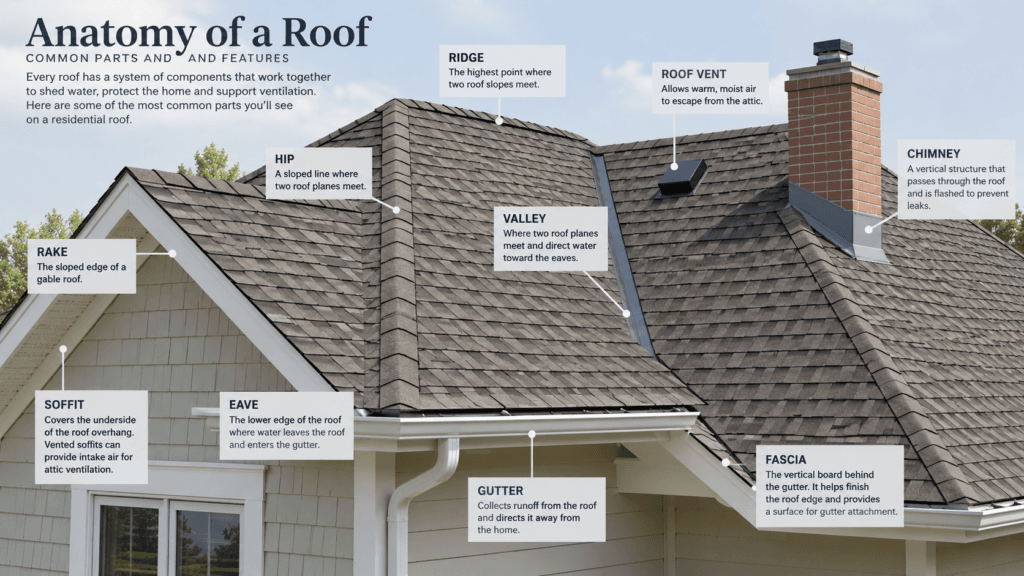
A valley is formed where two sloped roof planes meet and direct water toward the eaves. Because runoff from two roof areas is concentrated in one location, valleys are among the most heavily exposed parts of a pitched roof.
Valleys may be finished with shingles, metal flashing or a combination of materials depending on the roofing system.
WATCH FOR
Cracked or missing shingles, exposed fasteners, debris buildup, damaged valley metal or signs that water is being directed beneath the roofing material.
02 — FLASHING
Flashing is thin metal or another waterproof material installed where the roof meets walls, chimneys, skylights and other changes in surface or direction. Its purpose is to redirect water away from joints that would otherwise be vulnerable to leakage.
Common types include step flashing, counterflashing, apron flashing and valley flashing.
WATCH FOR
Loose or corroded metal, gaps, failed sealant, improperly layered flashing or repairs that rely heavily on roofing cement instead of proper flashing details.
03 — DRIP EDGE
Drip edge is metal flashing installed along the eaves and rakes of many roof systems. It helps direct runoff away from the roof deck and fascia while providing a clean termination for the roofing materials.
Properly installed drip edge also helps protect exposed roof edges from wind-driven rain.
WATCH FOR
Missing sections, bent metal, gaps at joints, corrosion or roofing materials that do not terminate correctly over the edge flashing.
GOOD TO KNOW
Water-management components have to overlap in the correct sequence so water continually moves toward the exterior. Caulk and roofing cement can be useful in specific details, but they should not replace properly layered flashing, underlayment and drainage paths.
ROOF EDGES & OVERHANGS
Understand the Parts Along the Roof Perimeter
The edges of a roof do more than finish the appearance of the home. Eaves, rakes, fascia and soffits help manage water, protect the roof structure and support ventilation around the perimeter.
01 — EAVES
The eave is the lower horizontal edge of a sloped roof where water leaves the roof surface and typically enters the gutter.
WATCH FOR
Rot, staining, sagging edges, damaged drip edge or water that overshoots or runs behind the gutter.
02 — RAKES
The rake is the sloped edge of a gable roof running from the eave up toward the ridge. It forms the outer edge of the roof along the gable end.
WATCH FOR
Loose shingles, lifted edge materials, damaged trim or wind-related wear.
03 — FASCIA
Fascia is the vertical board or trim located along the roof edge, usually behind the gutter. It helps finish the roof perimeter and provides a surface for gutter attachment.
WATCH FOR
Peeling paint, rot, soft wood, loose gutters or staining caused by poor drainage.
04 — SOFFITS
Soffits cover the underside of the roof overhang between the exterior wall and fascia. Vented soffits can also provide intake air for attic ventilation.
WATCH FOR
Blocked vents, moisture staining, damaged panels, insect entry or signs of poor attic airflow.
GOOD TO KNOW
These components work together. Water leaving the roof should move across the drip edge and into the gutter without soaking the fascia or soffit. Damage at the roof perimeter can sometimes be the visible result of a problem higher on the roof, such as failed flashing, clogged gutters or poor drainage.
ROOF PENETRATIONS
Pay Attention Wherever Something Passes Through the Roof
Every penetration creates an interruption in the roof covering and needs its own flashing or waterproofing detail. Plumbing vents, skylights, chimneys and roof-mounted equipment are common locations where leaks can develop if the surrounding materials are damaged or installed incorrectly.
01 — PLUMBING VENTS
Plumbing vent pipes extend through the roof to allow the home’s plumbing system to vent properly. A boot or flashing assembly seals the opening around the pipe.
WATCH FOR
Cracked rubber boots, loose flashing, exposed fasteners or gaps around the pipe.
02 — SKYLIGHTS
Skylights require flashing around all sides to direct water around the opening and back onto the roof surface below.
WATCH FOR
Failed flashing, deteriorated seals, staining around the interior opening or debris collecting above the skylight.
03 — CHIMNEYS
Chimneys pass through a large section of the roof and typically require step flashing, counterflashing and apron flashing to manage water along several surfaces.
WATCH FOR
Loose or corroded flashing, cracked mortar, failed sealant or staining near the chimney inside the attic or home.
04 — ROOF-MOUNTED EQUIPMENT
Solar mounts, satellite equipment, attic fans and other roof-mounted components create attachment points that must remain watertight.
WATCH FOR
Loose fasteners, cracked sealant, damaged flashing or penetrations that were added without a proper waterproofing detail.
GOOD TO KNOW
A penetration should rely on properly layered flashing and roofing materials, not sealant alone. Sealants can deteriorate with age and weather exposure, so the underlying detail should still direct water safely around the opening.
ROOF HIGH POINTS & VENTILATION
Understand What Happens at Ridges, Hips and Roof Vents
The highest points of a roof help shed water, finish intersecting roof planes and, in some systems, provide a path for warm attic air to escape. These details need to be installed carefully because they sit in highly exposed areas.
01 — RIDGES
The ridge is the horizontal line where two roof slopes meet at the highest point of the roof. It is typically covered with ridge-cap shingles, tiles or metal trim depending on the roofing material.
WATCH FOR
Loose or missing ridge caps, exposed fasteners, cracked materials or deterioration along the ridge line.
02 — HIPS
A hip is the sloped line where two roof planes meet and angle downward toward the eaves. Like ridges, hips are usually protected with specially shaped cap materials.
WATCH FOR
Loose caps, cracked tiles or shingles, gaps at intersections or wind damage along exposed edges.
03 — ROOF VENTS
Roof vents allow warm, moist air to leave the attic as part of the home’s ventilation system. Common exhaust vents include ridge vents, box vents and other roof-mounted vent types.
WATCH FOR
Blocked openings, damaged vent housings, loose flashing, cracked seals or signs that attic moisture is not being controlled effectively.
GOOD TO KNOW
Roof ventilation works best as a balanced system, with intake air entering near the eaves and exhaust air leaving higher on the roof. The roof vents themselves are only one part of that system. We’ll cover ventilation design in more detail in the next Roofing guide.
BEFORE YOU REPAIR OR REPLACE
Roof Anatomy Checklist
Before approving roof repairs or replacement work, confirm that the contractor is looking at the complete roofing system rather than only the visible surface.
□ Roof decking condition has been checked
□ Soft, damaged or deteriorated sheathing has been identified
□ Underlayment type and condition are understood
□ Valleys and drainage paths have been reviewed
□ Chimney, wall and skylight flashing have been inspected
□ Drip edge is present and properly integrated
□ Eaves and rakes are in good condition
□ Fascia and soffits have been checked for moisture damage
□ Plumbing vent boots and other penetrations have been inspected
□ Ridge and hip materials are secure
□ Roof vents are properly flashed and unobstructed
□ Gutters and roof edges direct water away correctly
□ Any concealed damage discovered during tear-off will be documented
□ Repairs to damaged components are included or clearly priced separately
GOOD TO KNOW
A roofing estimate may focus heavily on shingles, tile or metal because those are the most visible materials. Ask how decking, underlayment, flashing, penetrations, ventilation and edge details will be handled as well. Those concealed components often determine how well the finished roof performs.
Bottom Line
A roof is a complete system, not just the material you see from the street. Decking provides the structural base, underlayment adds secondary water protection, flashing manages vulnerable transitions, and the roof edges, penetrations and ventilation components all have specific jobs.
Understanding basic roof anatomy makes it easier to compare contractor proposals, understand repair recommendations and recognize when an estimate is addressing the whole system rather than simply replacing the surface material.