
DOOR REPLACEMENT & INSTALLATION
Know What to Expect Before Your Door Is Installed
Door replacement involves more than installing a new product. A good door can still perform poorly if the opening, flashing, anchoring or final adjustments are wrong. Learn what should be evaluated before installation, what details matter during the work and what to check before accepting the finished door.
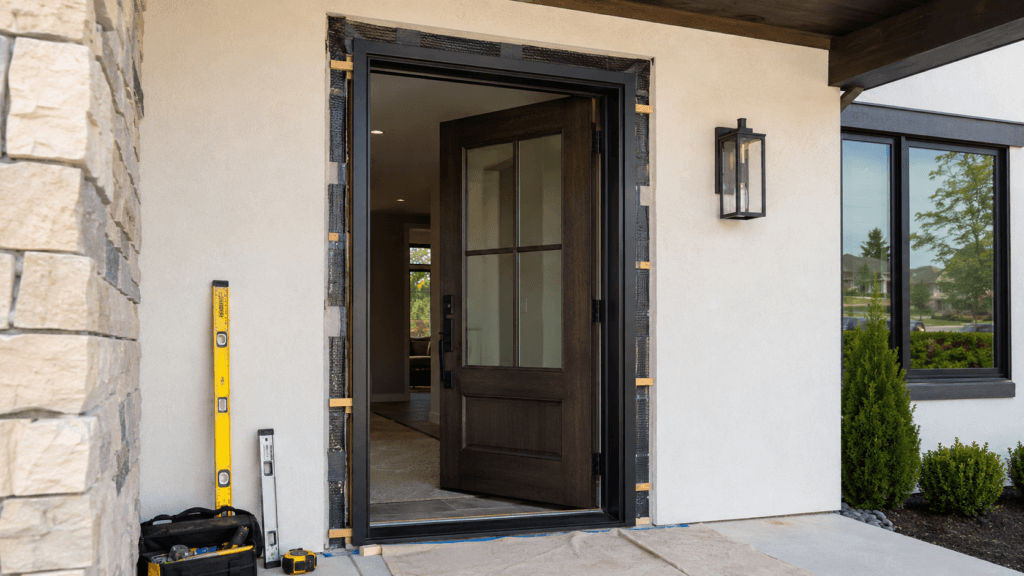
BEFORE REMOVAL
Evaluate the Existing Opening Before Anything Is Ordered
Before replacing a door, the contractor should understand what is already there. Existing framing, water damage, floor elevations and opening dimensions can all affect whether a straightforward replacement is possible or whether additional work will be needed.
01 — OPENING CONDITION
The existing frame, sill and surrounding finishes should be checked for deterioration, movement or previous repairs. Damage hidden behind trim may not become visible until the old door is removed.
WATCH FOR
Soft or deteriorated wood, corrosion, cracked finishes, loose framing or signs that the opening has moved out of square.
02 — WATER & MOISTURE
Staining, swelling or damaged finishes around the sill and jambs can indicate past water intrusion. Replacing the door without correcting the source can allow the same problem to continue behind the new system.
WATCH FOR
Water staining, rotted sill material, damaged flooring, mold-like discoloration or evidence of repeated caulking repairs.
03 — FLOOR & OPENING CONDITIONS
Interior and exterior floor heights affect threshold selection, drainage and accessibility. The installer should also verify that the opening is reasonably level, plumb and square before determining the final door size.
WATCH FOR
Uneven floors, exterior paving that slopes toward the opening, unusually high interior finishes or openings that are noticeably out of square.
GOOD TO KNOW
A replacement quote made before the existing conditions are fully understood may not include hidden repairs discovered during removal. Ask how unexpected framing, sill or water damage will be handled if it is uncovered.
FIELD VERIFICATION
Confirm the Opening Before the Door Is Fabricated
Door dimensions should be verified in the field before fabrication or ordering. The installer should check the existing opening, finished floor conditions and surrounding construction so the new system is sized for the actual conditions rather than relying only on old plans or nominal dimensions.
WHAT SHOULD BE MEASURED
The installer should verify the width and height at multiple locations rather than taking a single measurement. The opening should also be checked for level, plumb and square.
CHECK FOR
- Width at top, middle and bottom
- Height at both jambs and center
- Diagonal dimensions
- Sill elevation
- Interior and exterior finished floor heights
- Available wall or stacking space
WHAT SHOULD BE CONFIRMED
Measurements also need to be compared with the selected door system, sill type and installation method before the order is released.
CHECK FOR
- Actual frame dimensions
- Required rough-opening tolerance
- Threshold or recessed-track depth
- Door swing or panel stacking direction
- Structural header clearance
- Finish thickness around the opening
GOOD TO KNOW
For custom or large-format doors, field verification is especially important because fabrication changes can be expensive or impossible after production begins. Ask who is responsible for final measurements and approving the order.
INSTALLATION METHOD
Know What Type of Replacement You Are Actually Getting
Door replacement can range from installing a new unit into an existing frame to removing the entire assembly and rebuilding the opening. The installation method affects cost, waterproofing, finish work and how much of the existing construction can be inspected.
01 — INSERT / FRAME-IN-FRAME REPLACEMENT
The existing frame remains in place and the new door system is installed within or against it. This can reduce demolition and finish work when the existing frame is sound and the opening allows it.
BEST FOR
Projects where the existing frame is in good condition and minimizing disruption is a priority.
WATCH FOR
The new opening may become slightly smaller, and hidden deterioration behind the retained frame may remain inaccessible.
02 — FULL-FRAME REPLACEMENT
The old door and frame are removed back to the surrounding opening so the new system can be installed directly into the prepared rough opening.
BEST FOR
Older doors, damaged frames, water problems or projects where the sill, flashing and surrounding construction need to be evaluated and rebuilt.
WATCH FOR
This approach usually involves more demolition, waterproofing and interior or exterior finish repair, but it provides much better access to the underlying opening.
03 — NEW-CONSTRUCTION INSTALLATION
The door is installed into a newly framed or substantially rebuilt opening and integrated with the wall’s flashing and weather-resistive system before the surrounding finishes are completed.
BEST FOR
New homes, additions, enlarged openings and major remodels where framing and exterior finishes are already being modified.
WATCH FOR
The door, structure, flashing, sill and finish elevations should all be coordinated before the surrounding wall is closed.
GOOD TO KNOW
Ask the installer exactly what will remain, what will be removed and how the new door will be integrated with the surrounding wall. Two proposals that both say “replace door” may include very different scopes of work.
ROUGH OPENING & STRUCTURE
Make Sure the Opening Can Support the Door
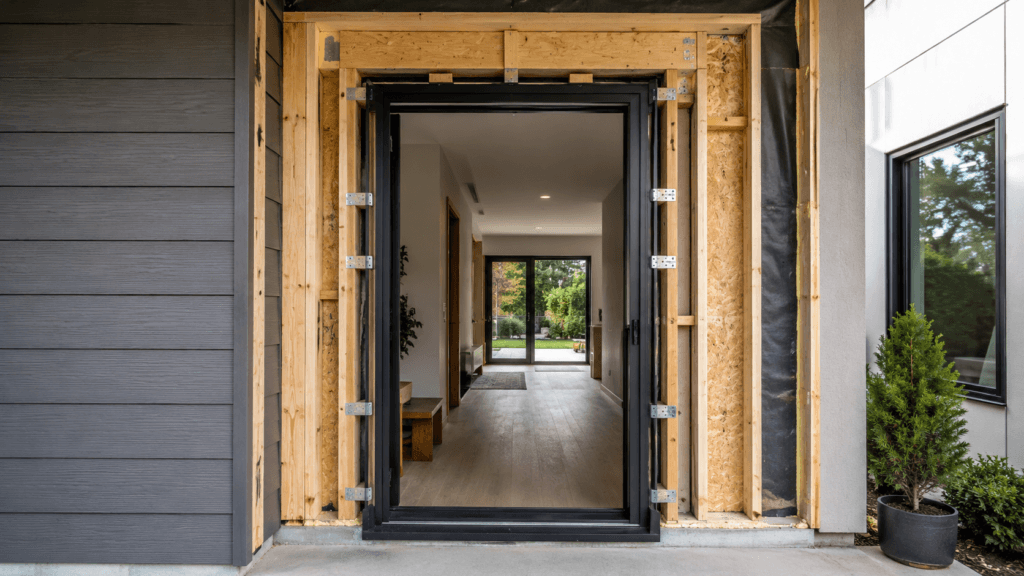
The rough opening has to do more than fit the frame. It also needs to provide adequate support, proper clearances and suitable attachment points for the selected door system.
OPENING CONDITION
Before installation, the opening should be checked for damaged framing, uneven surfaces and conditions that could prevent the new frame from being set plumb, level and square.
WATCH FOR
Rot, water damage, cracked framing, large gaps, uneven sill conditions or previous modifications that were never properly repaired.
STRUCTURAL SUPPORT
Large or heavy doors can place significant loads on the surrounding structure. Wide openings, top-hung systems and oversized glass panels may require a properly designed header or additional structural reinforcement.
WATCH FOR
Sagging headers, insufficient framing around attachment locations or structural work being altered in the field without clear documentation.
GOOD TO KNOW
The door installer should not be expected to solve major structural problems by simply adding more fasteners or shims. If the opening is inadequate for the selected system, the underlying framing should be corrected before the door is permanently installed.
FLASHING & WATERPROOFING
Make Sure Water Is Directed Back to the Exterior
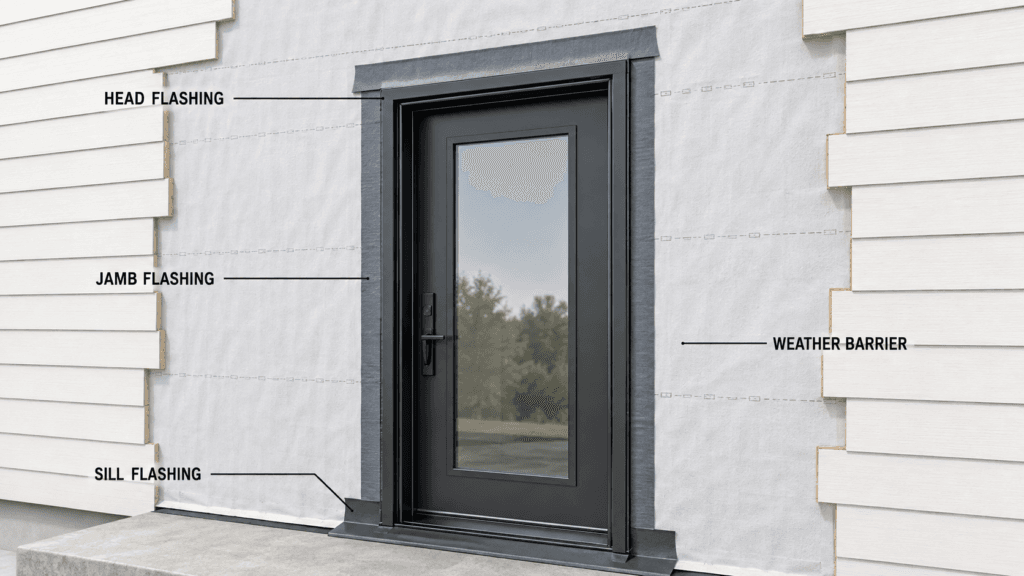
Exterior doors interrupt the wall’s water-management system, so the opening needs to be integrated with the surrounding weather barrier. Flashing should help direct incidental water toward the exterior rather than allowing it to become trapped behind the frame or finishes.
SILL & LOWER OPENING
The bottom of the opening is especially vulnerable because water can collect at the threshold. The sill area should be prepared so water that reaches the opening has a controlled path back toward the exterior.
WATCH FOR
Damaged substrate, missing sill preparation, reverse slopes, blocked drainage paths or sealant being used as the only form of water protection.
JAMBS & HEAD
Flashing at the sides and top of the opening should integrate with the surrounding weather-resistive barrier so water moving down the wall is directed around the door rather than behind it.
WATCH FOR
Gaps in the flashing, poorly integrated membrane, exposed fastener penetrations or conditions that could direct water behind the door frame.
GOOD TO KNOW
Flashing details vary by door manufacturer, wall construction and exterior finish. The important thing for a homeowner is that the door is integrated with the wall’s water-management system rather than relying only on exterior caulk to keep water out.
FRAME ALIGNMENT & ANCHORING
The Frame Should Be Straight, Supported and Secure
Once the opening is ready, the door frame needs to be positioned so it is level, plumb and square without being twisted or distorted. Shims and anchors support the frame and help transfer loads into the surrounding construction while maintaining proper clearances for the operating panels.
ALIGNMENT & SHIMMING
Shims support the frame at critical locations and help maintain consistent spacing between the door and the surrounding opening. Proper alignment is especially important around hinges, locks, rollers and other operating hardware.
WATCH FOR
Uneven gaps, bowed jambs, excessive shimming, frames forced into an irregular opening or door panels that move by themselves when partially opened.
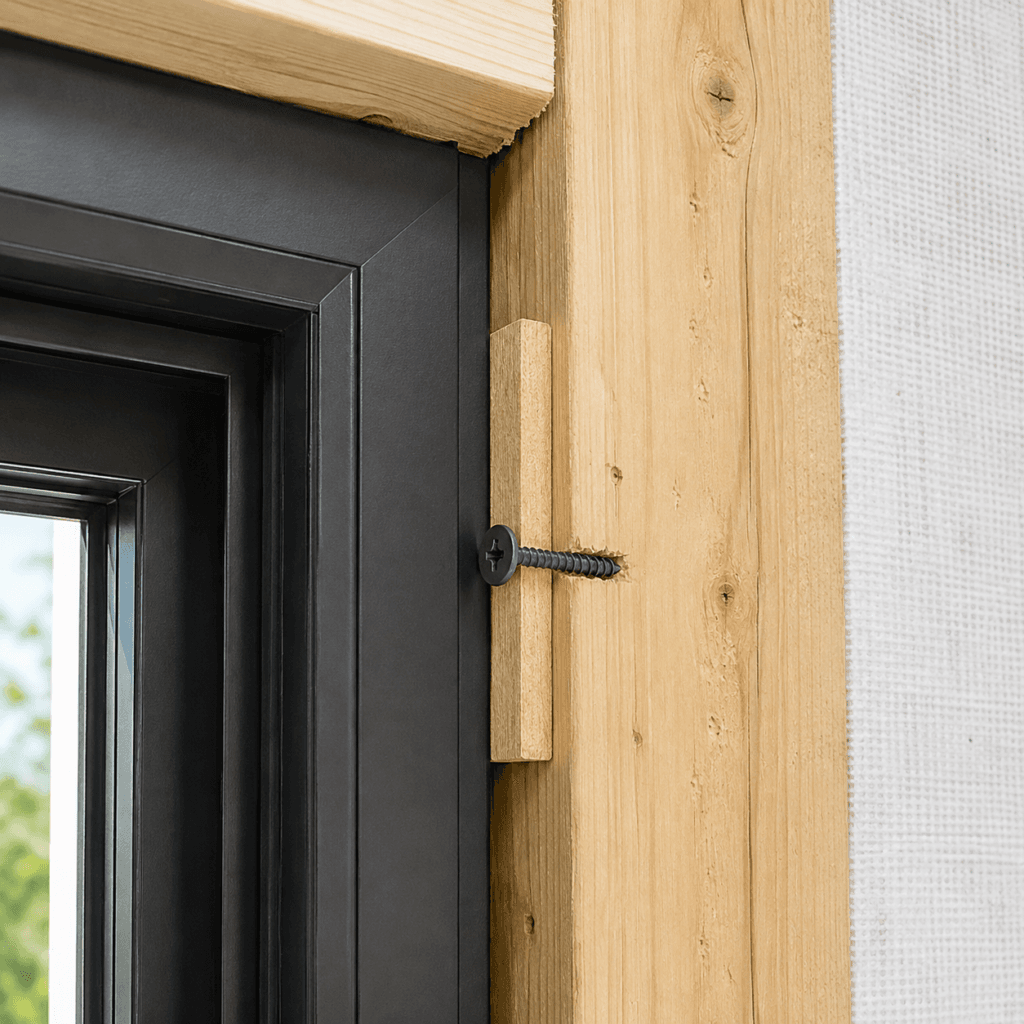
ANCHORS & FASTENERS
The frame should be secured using the fastening locations and hardware required for the specific door system. Fasteners need suitable backing so the frame is attached to structural material rather than relying only on trim or finish surfaces.
WATCH FOR
Missing fasteners, anchors driven so tightly that the frame distorts, unsupported fastening locations or field-drilled attachment points that do not match the manufacturer’s requirements.
GOOD TO KNOW
More fasteners do not automatically mean a better installation. Proper location, backing, shimming and frame alignment matter more than simply adding screws until the frame feels tight.
THRESHOLD & FLOOR COORDINATION
Make Sure the Bottom of the Door Works With the Finished Floors
The threshold has to coordinate with both the door system and the surrounding floor elevations. Poor planning at the sill can create trip points, drainage problems, unfinished gaps or a door that sits at the wrong height.
01 — FINISHED FLOOR HEIGHTS
Interior flooring thickness and exterior paving elevations should be confirmed before the door is permanently set. Tile, wood, stone and other finishes can change the final relationship between the floor and threshold.
WATCH FOR
Floor finishes ending noticeably above or below the intended threshold, improvised transition strips or last-minute grinding and patching around the sill.
02 — EXTERIOR DRAINAGE
Exterior surfaces should direct water away from the opening and should not block the sill drainage path. The installer should understand where water leaving the door system is intended to discharge.
WATCH FOR
Paving sloping toward the door, blocked weep locations, sealant covering drainage openings or exterior finishes installed too high against the sill.
03 — SUPPORT BELOW THE SILL
The threshold should have continuous, stable support where required by the door manufacturer. Unsupported sections can flex under traffic and may affect seals, drainage or long-term operation.
WATCH FOR
Visible movement when stepping on the threshold, large unsupported gaps or excessive sealant or foam being used in place of proper support.
GOOD TO KNOW
The best time to coordinate the threshold is before the final flooring and exterior paving are installed. Once both sides of the opening are finished, correcting elevation or drainage problems can become much more disruptive.
AIR SEALING & FINISH WORK
Finish the Perimeter Without Hiding Problems
After the door is anchored and operating correctly, the gap between the frame and surrounding wall needs to be insulated and sealed before interior and exterior finishes are completed. These materials help control air leakage, but they should not be used to compensate for poor flashing, inadequate support or an improperly aligned frame.
PERIMETER AIR SEALING
The space around the frame should be sealed using materials compatible with the door system and surrounding construction. The goal is to reduce uncontrolled air movement without distorting the frame or blocking drainage.
WATCH FOR
Large unsealed gaps, excessive expanding foam, foam pushing the frame out of alignment or sealant covering drainage and weep locations.
TRIM & EXTERIOR FINISHES
Interior casing, exterior trim, stucco, siding or other finishes should be installed after the door has been aligned, secured and weatherproofed. Finish materials should cover the installation cleanly without interfering with the door or its drainage system.
WATCH FOR
Trim being used to conceal large installation gaps, exterior finishes blocking sill drainage, cracked sealant joints or unfinished transitions around the frame.
GOOD TO KNOW
Caulk, foam and trim are finishing components, not substitutes for proper flashing, anchoring or sill preparation. If the underlying installation is wrong, covering it with finish materials does not correct the problem.
Need to estimate sealant quantity? Use the Sealant Calculator to estimate how many cartridges or sausages you’ll need based on joint width, depth and total joint length.
FINAL ADJUSTMENT & TESTING
Make Sure the Door Works Before the Job Is Finished
Before trim is completed and the installer leaves, the door should be operated, locked and visually checked. Small alignment or hardware problems are much easier to correct before the installation is considered complete.
01 — OPERATION
The door should open and close smoothly without excessive force, scraping or binding. Sliding panels should travel consistently along the track, while hinged doors should remain properly aligned through the full swing.
WATCH FOR
Dragging panels, uneven movement, rattling, unexpected resistance or doors that move on their own when partially opened.
02 — LOCKS & HARDWARE
Handles, latches, deadbolts and multipoint locks should engage without requiring the door to be lifted, pushed or forced into position.
WATCH FOR
Locks that only engage when pressure is applied, loose handles, misaligned strikes or multipoint hardware that does not engage consistently.
03 — PANEL GAPS & WEATHER SEALS
Clearances between the panel and frame should appear consistent, and weather stripping should make continuous contact where the system is designed to seal.
WATCH FOR
Uneven gaps, visible daylight, compressed or displaced gaskets, loose weatherstripping or panels that do not sit evenly in the frame.
04 — SILL & DRAINAGE
Tracks, weep locations and drainage paths should remain clear after installation and finish work. Exterior sealants and finishes should not block the intended path for water to leave the system.
WATCH FOR
Blocked weeps, construction debris in tracks, standing water or sealant covering drainage openings.
GOOD TO KNOW
Operate the door several times before final acceptance. A properly installed system should feel consistent from one cycle to the next without needing unusual force or adjustment by the homeowner.
RED FLAGS
Installation Problems Worth Questioning
Not every unusual-looking condition means the installation is wrong, but certain problems deserve an explanation before the work is covered with trim or considered complete.
01 — CAULK USED AS THE MAIN WATER BARRIER
Exterior sealant should support the weatherproofing system, not replace proper sill preparation, flashing and drainage.
WATCH FOR
Large beads of caulk being used to fill construction gaps, flashing that cannot be identified or repeated attempts to stop water problems by adding more sealant.
02 — FRAME FORCED TO FIT THE OPENING
The rough opening should allow the frame to be installed without excessive twisting, bending or pressure.
WATCH FOR
Bowed jambs, uneven panel gaps, excessive shims or fasteners being tightened until the frame visibly changes shape.
03 — DRAINAGE PATHS BLOCKED
Tracks, sill chambers and weep locations need a clear path for water to leave the door system.
WATCH FOR
Sealant over weep holes, flooring or exterior finishes installed against drainage outlets, standing water or construction debris left inside the track.
04 — POOR OPERATION ACCEPTED AS NORMAL
A newly installed door should not require unusual effort to operate simply because it is large or heavy.
WATCH FOR
Panels that scrape, locks that require pushing or lifting the door, persistent rattling, doors that will not stay aligned or repeated adjustments that do not solve the issue.
GOOD TO KNOW
If something does not look or operate correctly, ask the installer to explain the condition before the work is concealed. Manufacturer installation instructions and product requirements can help determine whether the condition is acceptable.
QUESTIONS TO ASK
Know What Is Included Before Installation Begins
A few questions before the work starts can clarify responsibility for measurements, waterproofing, repairs, finish work and final adjustments. The goal is to understand the scope before the existing door is removed.
☐ Who is responsible for the final field measurements?
☐ Is this an insert replacement or a full-frame replacement?
☐ What happens if damaged framing or water intrusion is uncovered?
☐ Who is responsible for flashing and waterproofing the opening?
☐ Does the price include removal and disposal of the existing door?
☐ Are interior and exterior trim repairs included?
☐ Who coordinates flooring or exterior paving around the threshold?
☐ Will the door be adjusted and tested before completion?
☐ Are locks, rollers and multipoint hardware included in the final adjustment?
☐ How will sill drainage and weep locations be checked?
☐ What installation warranty is provided?
☐ What manufacturer warranty applies to the door itself?
☐ Who should be contacted if the door becomes difficult to operate?
☐ Will product and warranty information be provided at closeout?
GOOD TO KNOW
If a proposal is unclear about measuring, flashing, repairs, finish work or final adjustment, ask for those responsibilities to be identified before signing. A lower price may simply reflect a narrower installation scope.
FINAL CHECK
Door Replacement & Installation Checklist
Before the project is considered complete, confirm that the new door is properly integrated with the opening, operates correctly and that the surrounding finishes have not hidden unresolved installation problems.
☐ Final door size matches the verified opening
☐ Frame is level, plumb and square
☐ Rough-opening damage has been repaired
☐ Sill and threshold have continuous support
☐ Flashing and waterproofing are complete
☐ Frame anchors and shims are properly located
☐ Perimeter gaps are insulated and air sealed
☐ Exterior drainage paths and weeps remain clear
☐ Interior and exterior finishes are complete
☐ Door opens and closes smoothly
☐ Panel gaps appear consistent
☐ Locks and hardware engage properly
☐ Weather seals make continuous contact
☐ Product and installation warranty information is provided
GOOD TO KNOW
Take a few photos of the opening, flashing and anchoring before the work is covered by trim whenever practical. That documentation can be useful later if questions arise about drainage, repairs or warranty work.
Bottom Line
A successful door replacement depends on more than the door itself. The existing opening, measurements, structural support, flashing, sill conditions, anchoring, air sealing and final adjustments all affect how well the new system performs.
Homeowners do not need to install the door themselves to understand the important details. Knowing what should be checked before, during and after installation makes it easier to compare proposals, ask better questions and recognize problems before the work is concealed.