
SIDING & EXTERIOR GUIDE
Protect the Wall Before the Siding Goes On
Weather barriers and flashing help protect exterior walls from water and moisture damage. Learn how house wrap, drainage planes, window and door flashing, and other details work together behind the siding.
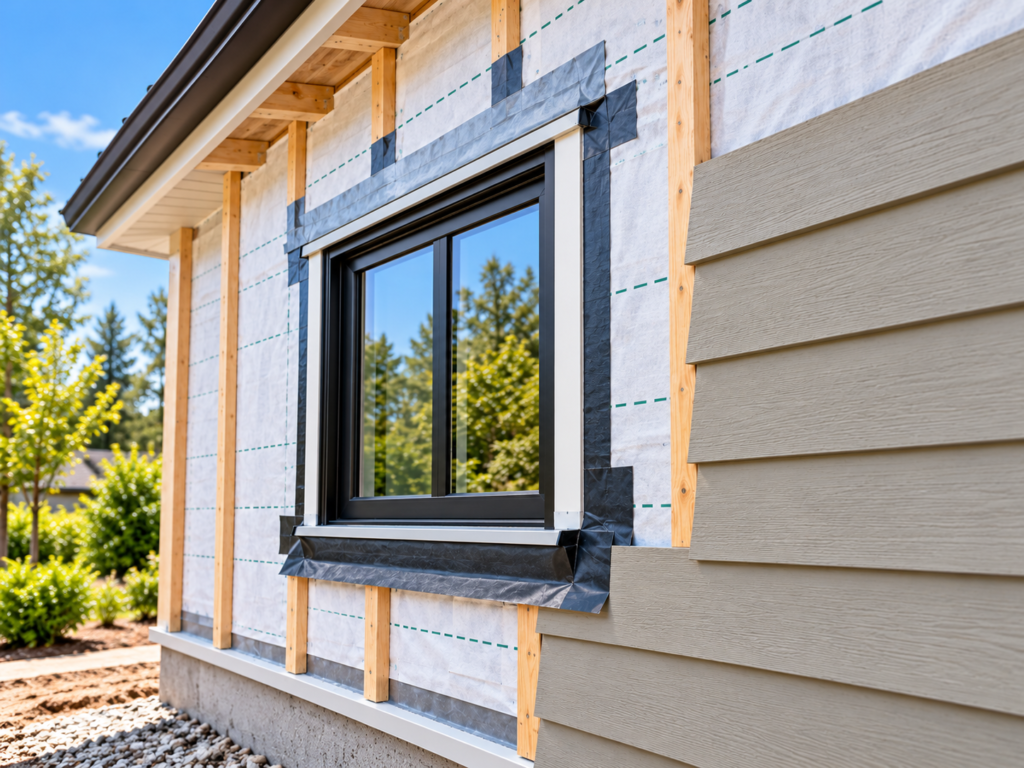
START WITH THE WALL ASSEMBLY
Understand What Sits Behind the Siding
Siding is not the only layer responsible for keeping water out of a wall. Behind the finished exterior is typically a weather-resistant barrier, sheathing, flashing and other components designed to direct water away from vulnerable areas and allow incidental moisture to drain.
Windows, doors, roof-to-wall intersections, penetrations and horizontal transitions are especially important because they interrupt the drainage plane. Weather barriers and flashing need to overlap in the correct sequence so water is directed outward rather than trapped behind the siding.
WATER MANAGEMENT BASICS
Six Parts That Help Keep Exterior Walls Dry
Weather barriers and flashing work as a system rather than as isolated products. Each layer needs to overlap and connect correctly so water can drain toward the exterior instead of becoming trapped inside the wall.
01 — WATER-RESISTIVE BARRIER
The WRB sits behind the siding and helps stop wind-driven rain from reaching the wall sheathing while allowing the assembly to manage incidental moisture.
02 — DRAINAGE PLANE
A continuous drainage plane gives water that gets behind the siding a clear path downward and back to the exterior instead of allowing it to collect inside the wall.
03 — WINDOW & DOOR FLASHING
Openings interrupt the drainage plane. Sill pans, flashing tape and head flashing should be layered so water drains around the opening rather than into the framing.
04 — ROOF-TO-WALL FLASHING
Where a roof meets an exterior wall, step flashing and kickout flashing help direct roof runoff away from the siding and wall assembly.
05 — PENETRATIONS
Vents, pipes, electrical boxes, hose bibs and other wall penetrations need properly integrated flashing or sealing so they do not become direct paths for water.
06 — SIDING CLEARANCES & DRAINAGE
Siding should maintain required clearances from roofs, grade and horizontal surfaces. Some wall systems also use a drainage gap or rainscreen to improve drying behind the cladding.
WEATHER BARRIER OPTIONS
Common Ways Exterior Walls Manage Water
Different wall systems use different materials to create the weather-resistant barrier. The goal is the same: provide a continuous layer behind the siding that helps drain water away from the sheathing while tying into flashing at openings and penetrations.
01 — HOUSE WRAP
House wrap is a lightweight sheet membrane installed over exterior sheathing before siding. Seams, corners and penetrations need to be properly overlapped or taped so the layer remains continuous.
02 — BUILDING PAPER
Asphalt-saturated building paper has been used behind many siding and stucco systems for decades. It is typically installed in overlapping courses so water naturally sheds downward.
03 — FLUID-APPLIED WRB
Fluid-applied barriers are rolled, sprayed or troweled onto the sheathing to create a continuous membrane. They can simplify detailing around irregular shapes but depend on correct coverage and thickness.
04 — INTEGRATED SHEATHING
Some sheathing systems include a factory-applied water-resistant surface. Panel joints and openings still require approved tape or flashing so the individual panels become one continuous drainage layer.
GOOD TO KNOW
The best WRB is not simply the most expensive product. Compatibility with the siding, flashing materials, climate and overall wall design matters more than choosing one product in isolation.
FLASHING DETAILS
Where Flashing Matters Most
Flashing is used at openings, intersections and penetrations where water is most likely to enter the wall assembly. These details need to connect back to the weather barrier so water is directed outward instead of trapped behind the siding.
01 — WINDOWS & DOORS
Windows and doors interrupt the drainage plane, so the opening needs to be flashed as a complete system. Sill pans, jamb flashing and head flashing should be layered so any water that reaches the opening drains back to the exterior.
02 — ROOF-TO-WALL INTERSECTIONS
Where a sloped roof meets an exterior wall, step flashing helps move water onto the roof surface while kickout flashing directs runoff away from the siding at the lower end. Missing or poorly integrated flashing in these areas can lead to concentrated moisture damage.
03 — WALL PENETRATIONS
Exterior lights, vents, electrical boxes, pipes and hose bibs all create openings through the wall. Each penetration should be flashed or sealed in a way that maintains the continuity of the weather barrier and allows water to drain around it.
GOOD TO KNOW
Flashing works best when it follows the basic “shingle principle”: upper layers overlap lower layers so water naturally drains downward and outward. Reverse laps and trapped edges can redirect water into the wall instead.

DRAINAGE & DRYING
Give Water a Way Out
Even with good flashing and a continuous weather barrier, some moisture can still get behind exterior cladding. The wall needs a path for that water to drain and, ideally, enough airflow or drying potential to keep moisture from remaining trapped.
01 — DIRECT-APPLIED SIDING
Some siding systems are installed directly over the weather-resistant barrier or over minimal spacer material. These assemblies rely heavily on proper laps, flashing and drainage at the bottom of the wall so incidental water can escape.
02 — RAINSCREEN ASSEMBLIES
A rainscreen creates a small drainage and ventilation gap between the siding and weather barrier, often using furring strips, drainage mats or other spacer systems. This added space can improve drainage and drying, especially in wet or humid climates.
GOOD TO KNOW
A rainscreen does not replace the weather barrier. It works with it. The siding remains the first line of defense, the drainage space helps water move and dry, and the WRB protects the wall behind both layers.
AVOID THESE
Common Weather Barrier & Flashing Mistakes
Small detailing errors can create major moisture problems because water usually finds the weakest point in the wall assembly. Most failures come from broken drainage paths, poor sequencing or incomplete flashing around openings and transitions.
01 — REVERSE LAPS
Upper layers should overlap lower layers so water sheds outward. Reverse laps can direct water behind the weather barrier instead.
02 — MISSING SILL FLASHING
Windows and doors need proper sill protection so water that reaches the opening can drain back out rather than soak into the framing.
03 — INCOMPLETE HEAD FLASHING
Head flashing should extend beyond the opening and integrate with the weather barrier above. Poorly detailed heads can let water run behind the window or door.
04 — UNSEALED PENETRATIONS
Pipes, vents, lights and electrical boxes can become direct leak paths if the weather barrier is simply cut around them without proper flashing or sealing.
05 — BLOCKED DRAINAGE PATHS
Caulk, trim or siding installed too tightly can trap water at the bottom of the wall or around openings instead of allowing it to drain.
06 — POOR MATERIAL COMPATIBILITY
Not every tape, sealant, membrane and flashing material works well together. Incompatible products can lose adhesion, react chemically or fail prematurely.
BEFORE SIDING GOES ON
Weather Barrier & Flashing Checklist
Before covering the wall with siding, confirm the main water-management details are complete and properly integrated.
☐ Weather-resistant barrier is continuous across the wall
☐ Seams and laps shed water downward
☐ Window and door sills are properly flashed
☐ Jamb and head flashing are complete
☐ Roof-to-wall flashing is installed where required
☐ Kickout flashing directs roof runoff away from the wall
☐ Wall penetrations are properly flashed or sealed
☐ WRB is integrated with all flashing components
☐ Drainage paths at the bottom of the wall remain open
☐ Required siding clearances are maintained
☐ Rainscreen or drainage space is installed where specified
☐ Tapes, membranes and sealants are compatible with one another
Bottom Line
Weather barriers and flashing are what allow the exterior wall to manage water that gets past the siding. A durable wall depends less on any single product than on how the WRB, flashing, openings, penetrations and drainage paths are connected together.
The most important principle is simple: water should always have a clear path downward and outward. Proper sequencing before the siding is installed can prevent hidden moisture damage that may otherwise go unnoticed for years.