
← BACK TO DECKS & OUTDOOR LIVING
DECK INSTALLATION
How a Deck Goes From Footings to Finished Boards
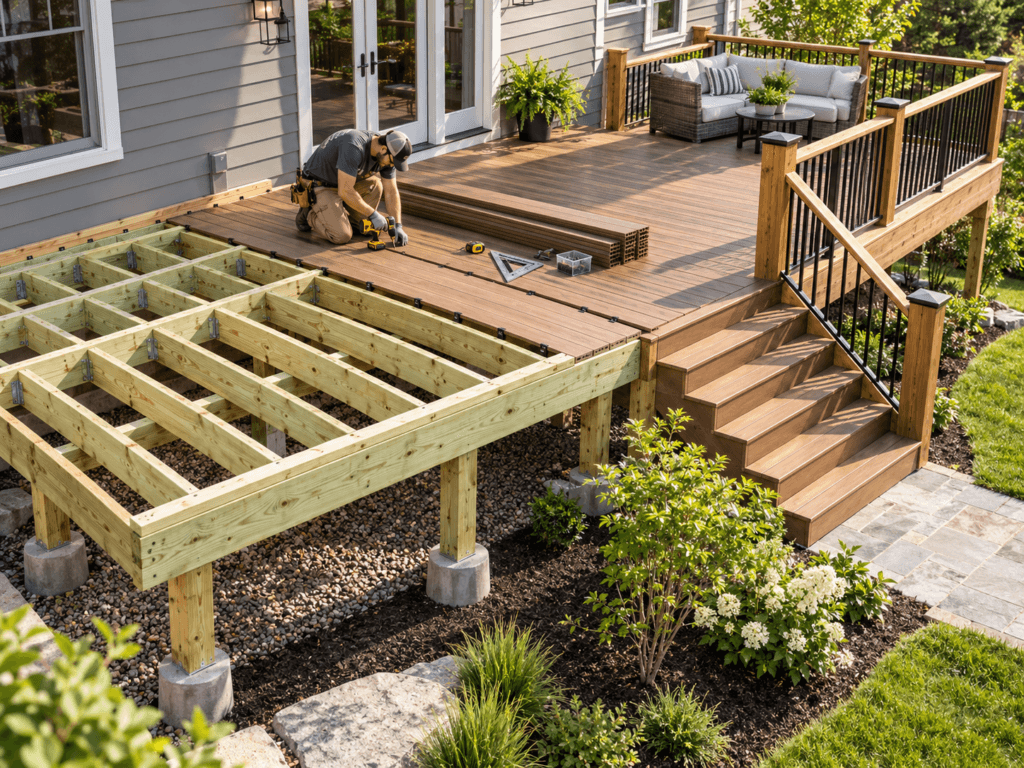
Deck construction follows a clear sequence, from layout and foundations through framing, decking, stairs and guards. Understanding how those stages fit together makes it easier to plan the work, recognize important details and avoid problems that are difficult to correct after the deck is finished.
BEFORE CONSTRUCTION
Start With Layout, Permits and Site Conditions
Deck installation goes much more smoothly when the major decisions are settled before digging begins. Confirm the layout, understand local requirements and make sure the site can support the planned work before materials start arriving.
01 — LAYOUT & DIMENSIONS
Confirm the overall deck size, finished elevation, stair location and relationship to doors, windows and the yard. Small layout changes are much easier to make before footing locations are marked.
02 — PERMITS & REQUIREMENTS
Decks may require permits, inspections and specific structural details depending on height, size and location. Verify local requirements before construction so footing, framing, guard and stair details are not built twice.
03 — SITE ACCESS & CONDITIONS
Plan how lumber, concrete and equipment will reach the work area. Also account for slope, drainage, utilities, landscaping and anything else that could interfere with footing locations or construction access.
GOOD TO KNOW
Before excavation starts, confirm underground utility locations and make sure the proposed deck does not conflict with setbacks, easements or exterior equipment that may need future service access.
FOUNDATION & SUPPORT
Build From the Ground Up
The foundation sets the position and elevation of the entire deck. Footings, posts and beams need to line up with the framing plan so the structure above can be built square, level and properly supported.
01 — LAYOUT & FOOTING LOCATIONS
Transfer the deck dimensions to the site and establish the exact footing locations before digging. Recheck diagonals, offsets from the house and stair locations so small layout errors do not carry into the framing.
02 — FOOTINGS
Footings transfer deck loads into the soil. Their diameter, depth and reinforcement depend on the deck design, soil conditions, frost depth and local requirements.
03 — POSTS
Posts carry the beam loads down to the footings. Set them plumb, confirm the required elevation and use approved post bases or anchors to create a secure connection to the concrete.
04 — BEAMS
Beams support the joists and establish the main framing elevation. They should be properly sized, aligned and securely connected to the posts before joist installation begins.
WATCH FOR
Do not use the finished deck surface to hide foundation mistakes. Misaligned footings, out-of-plumb posts or uneven beam elevations are much easier to correct before joists and decking are installed.
FRAMING
Set the Structure Before the Decking Goes Down
Once the foundation and beams are in place, the framing ties the deck together. This is the stage where alignment, spacing and connections matter most because many of these details will be difficult to access after the decking is installed.
LEDGER & HOUSE CONNECTION
For attached decks, the ledger must be properly fastened to the house structure and flashed to keep water out of the wall assembly. The ledger also establishes one side of the joist layout, so its position and elevation need to be accurate.
JOISTS
Joists should be installed at the spacing required by the framing design and the decking product above. Keep crowns oriented consistently, check the framing for straightness and use approved hangers or bearing conditions at each end.
BLOCKING & BRACING
Blocking helps keep joists aligned and reduces twisting. Additional bracing may be needed for lateral stability, stair openings, guard posts or other areas where loads are concentrated.
GOOD TO KNOW
Before covering the framing, check that the deck is square, joist spacing is consistent, connectors are fully fastened and any required flashing or protective detailing is complete.
DECKING INSTALLATION
Board Layout Matters More Than It Looks
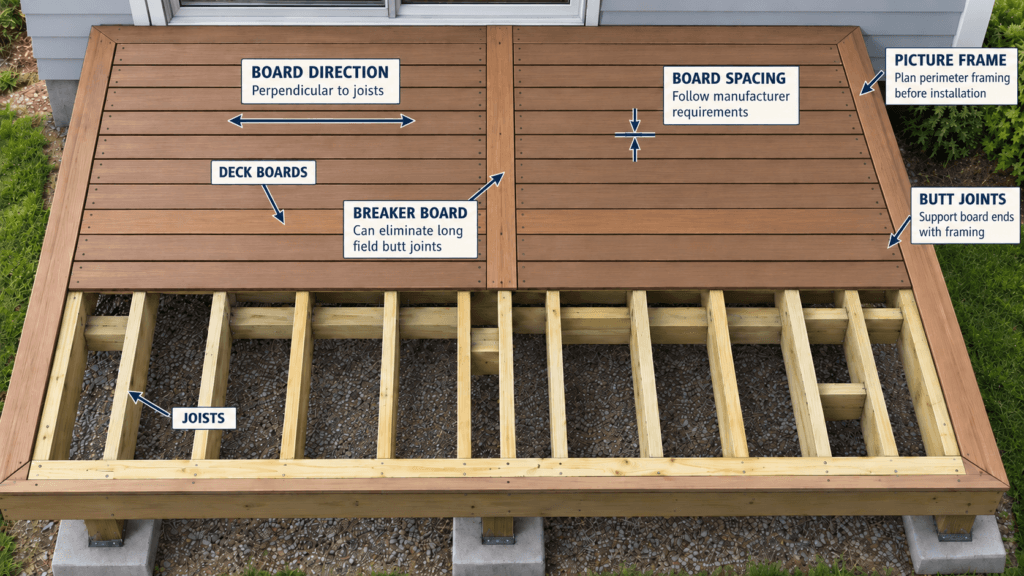
Deck boards are the finished surface, but how they are laid out affects appearance, drainage, movement and long-term performance. Board direction, spacing, fastening and edge details should all be worked out before installation starts.
BOARD DIRECTION & LAYOUT
Most decking runs perpendicular to the joists, but the overall pattern should still be planned before the first board is fastened. Think through picture-frame borders, breaker boards, stair transitions and where cut ends or butt joints will land.
SPACING
Deck boards need enough space for drainage and normal material movement. Required gaps vary by material and moisture content, so follow the decking manufacturer’s instructions rather than assuming one spacing works for every product.
FASTENING
Face screws, plugs and hidden-fastener systems can all work when they are appropriate for the decking material. Fasteners should be installed consistently, kept properly aligned and used with the joist spacing required by the product.
ENDS & JOINTS
Butt joints and board ends need solid support. Staggering joints, adding blocking where required and planning the layout before cutting can make the finished deck look cleaner and reduce weak or awkward transitions.
GOOD TO KNOW
Composite and PVC decking may have specific requirements for joist spacing, end gaps and fastener systems that differ from wood decking. Always check the current installation instructions for the exact product being used.
ESTIMATE DECK BOARDS
Before ordering material, use the Deck Board Calculator to estimate the number of boards your deck may require based on deck dimensions, board size and waste allowance.
STAIRS & GUARDS
Finish the Access and Edge Protection
Stairs, guards and handrails should be planned as part of the deck structure, not treated as finish items added at the end. Their connections need to be strong enough for repeated use and should be coordinated with the framing before the decking is complete.
STAIRS
Deck stairs need consistent rise and run, solid stringer support and a stable landing at the bottom. Stair width, tread depth and overall geometry should be confirmed before stringers are cut.
GUARDS
Guards protect open edges of elevated decks. Guard posts should be tied securely into the framing so the railing system does not rely only on deck boards or surface-mounted trim for strength.
HANDRAILS
Where required, handrails should provide a continuous, graspable surface along the stair. Height, profile and attachment should follow local requirements and remain comfortable to use.
WATCH FOR
Loose guard posts, uneven stair risers and weak stringer connections are common trouble spots. Movement at any of these areas should be corrected structurally rather than hidden with finish work.
WATER & DURABILITY DETAILS
Protect the Framing Before It Gets Covered
Deck framing is exposed to rain, condensation and trapped debris over its life. Good water-management details and compatible hardware help the structure dry out and reduce the chance of hidden deterioration.
LEDGER FLASHING
For attached decks, flashing should direct water over and away from the ledger rather than behind it. This connection is especially important because water intrusion can damage both the deck and the house.
JOISTS & BEAMS
Horizontal framing surfaces can hold moisture, especially where boards overlap or debris collects. Proper spacing, drainage and protective detailing help reduce repeated wetting and give the framing a chance to dry.
HARDWARE & FASTENERS
Joist hangers, post bases, structural screws and other connectors should be compatible with pressure-treated lumber and suitable for the environment. Coastal or consistently wet locations may require higher levels of corrosion resistance.
GOOD TO KNOW
Many moisture problems become hidden once the decking is installed. Check flashing, connectors, joist tops and other vulnerable details before the framing is covered.
COMMON INSTALLATION MISTAKES
Small Errors Can Create Bigger Problems Later
Many deck problems start with details that seem minor during construction but become difficult to correct once the decking, stairs and railings are finished.
01 — POOR FOOTING LAYOUT
Footings that are misplaced or out of alignment can force posts and beams into awkward positions and make the framing harder to square.
02 — WEAK LEDGER ATTACHMENT
An attached deck depends heavily on a properly fastened and flashed ledger. Inadequate fastening or poor waterproofing can lead to movement, water damage or structural failure.
03 — INCORRECT JOIST SPACING
Joists spaced too far apart can make decking feel soft or fail to meet the decking manufacturer’s requirements, especially with composite or PVC products.
04 — IMPROPER DECK-BOARD GAPS
Boards installed too tightly may trap debris or create problems as materials expand. Excessive gaps can also look uneven and affect comfort underfoot.
05 — MISSING FLASHING OR WATER DETAILING
Skipping flashing at the ledger or ignoring other moisture-prone areas can allow water to reach hidden framing where damage may go unnoticed for years.
06 — WEAK STAIR OR GUARD CONNECTIONS
Stairs and guard posts need structural connections into the framing. Surface fasteners alone are often not enough to resist repeated movement and everyday loads.
GOOD TO KNOW
A clean-looking deck can still hide poor structural or moisture-management details. The best time to correct these problems is before the framing and connections are covered.
BEFORE YOU FINISH
Deck Installation Checklist
Before calling the deck complete, confirm that the structure, decking, access and water-management details have all been checked.
□ Footings and posts are aligned and secure
□ Beams are level and properly connected
□ Joist spacing matches the framing and decking requirements
□ Ledger attachment and flashing are complete
□ Blocking and bracing are installed where required
□ Deck boards are properly spaced and fastened
□ Butt joints and board ends have solid support
□ Stairs are consistent and securely supported
□ Guard posts are tied into the framing
□ Handrails are installed where required
□ Structural connectors are fully fastened
□ Hardware is compatible with treated lumber
□ Water can drain away from framing and the house
□ Cut ends and exposed framing are protected as required
□ The deck has been checked for movement or loose connections
□ Final inspection requirements have been completed
Bottom Line
Deck installation is a sequence, and each stage depends on the one before it. Accurate layout, solid foundations, properly connected framing, careful board installation and secure stairs and guards all contribute to a deck that feels stable and performs well over time.
The best results come from checking the hidden details before they are covered and following the requirements for the specific framing, decking and hardware being used.